
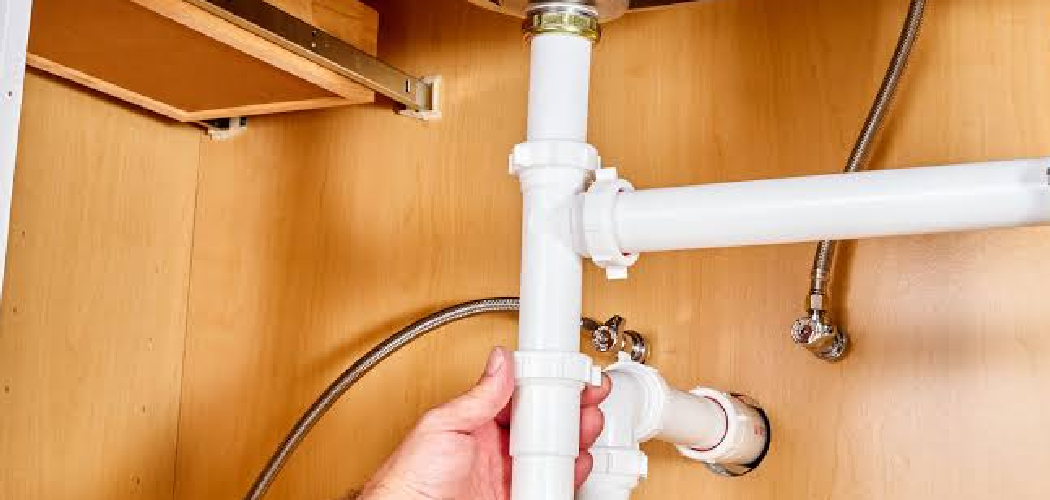

A leaky or disconnected sink can bring your whole kitchen to a halt. The good news? You don’t need to call a plumber every time something goes wrong under the basin. Learning how to hook up a kitchen sink drain is one of those handy skills that saves you money, time, and a whole lot of stress.
If you’ve ever stared at the maze of pipes below your sink and felt overwhelmed, you’re not alone. But once you understand how the pieces fit together, it all starts to make sense. Most connections simply twist, slide, and tighten into place.
This guide walks you through every step, from gathering your tools to running a leak test, so you can confidently assemble your sink plumbing and get your kitchen back in working order.
Why Learning to Connect a Kitchen Sink Drain Matters
Knowing how to connect your own sink drain puts real power in your hands. Plumbing calls aren’t cheap, and a simple drain hookup rarely justifies the cost of hiring a professional. When you can handle it yourself, you keep your budget where it belongs.
There’s also the convenience factor. Drains loosen, washers wear out, and pipes need adjusting after you install a new faucet or garbage disposal. With this skill, you fix problems on your own schedule instead of waiting days for an appointment.
Beyond saving money, you gain confidence. Once you understand how a P-trap, tailpiece, and slip nuts work together, other home repairs feel far less intimidating. You’ll start seeing your kitchen as something you can maintain and improve, not just live in.
Tools and Materials You’ll Need
Before you crawl under the sink, gather everything you need. Having the right gear within reach makes the whole job smoother and keeps you from running back and forth to the hardware store. A thorough leak test now saves you from water damage and frustration later.
- Drain basket (strainer assembly) – fits into the sink opening
- P-trap kit – usually includes the trap, tailpiece, and trap arm
- Slip nuts and washers – often come with the trap kit
- Plumber’s putty or silicone sealant – seals the drain basket
- Channel-lock or slip-joint pliers – for snugging connections
- Bucket and old towels – to catch leftover water
- Plumber’s tape – for any threaded fittings
- A clean rag – to wipe surfaces before sealing
- Adjustable headlamp (optional) – frees up both hands and lights up the dark cabinet space
That optional headlamp is a small luxury that makes a surprising difference when you’re working in tight, shadowy spots.
Step-by-Step Guide on How to Hook Up a Kitchen Sink Drain
Step 1 – Clear the cabinet and prep your workspace
Start by emptying the cabinet beneath your sink. Pull out the cleaning sprays, dish soaps, and anything else stored down there. You need room to move and a clear view of every pipe.
Slide a bucket directly under the existing drain to catch any trapped water. Even a “dry” sink usually holds a little water in the P-trap, and it tends to spill the moment you loosen a connection.
Lay down a towel to soak up drips and protect your knees. Once your space is clear and dry, you’ll feel far more relaxed. Knowing how to hook up a kitchen sink drain begins with a tidy, well-lit area where you can actually see what you’re doing.

Step 2 – Install the drain basket with plumber’s putty
Roll a small amount of plumber’s putty between your palms until it forms a soft rope about the thickness of a pencil. Press this putty around the underside lip of the drain basket.
Set the basket firmly into the sink opening from above. Push down gently and you’ll see a little ring of putty squeeze out around the edge. That ooze tells you the seal is working.
From below, slide on the rubber washer, then the cardboard or fiber washer, and finally thread on the locknut. Tighten it by hand first, then snug it with pliers. Wipe away the excess putty up top with your rag for a clean, professional finish.
Step 3 – Attach the tailpiece to the drain basket
The tailpiece is the straight pipe that drops down from the drain basket. It carries water from the sink into the rest of your plumbing.
Thread the tailpiece onto the bottom of the drain basket. Many baskets use a slip nut and washer here, so slide the washer on first with the beveled edge facing the connection.
Hand-tighten the slip nut until it feels snug. You want it firm but not cranked down so hard that you crack the plastic threads. Give the tailpiece a gentle wiggle to confirm it sits straight and secure. A crooked tailpiece throws off everything that follows, so take a moment to line it up properly before moving on.
Step 4 – Position the P-trap
The P-trap is that curved, U-shaped bend that holds a little water to block sewer gases from rising into your kitchen. It’s the heart of your drain system.
Hold the P-trap up to the tailpiece and check the fit. The curved section should hang down low, with the open end pointing toward the wall pipe. Loosen the slip nuts on the trap so the pieces slide freely.
Slide the trap onto the bottom of the tailpiece, fitting the washers into place as you go. Don’t tighten anything yet. You’re just dry-fitting for now to make sure the angles look right. A properly placed P-trap sits level and lines up naturally with the trap arm you’ll connect next.
Step 5 – Connect the trap arm to the wall drain
The trap arm is the horizontal pipe that runs from the P-trap to the drainpipe sticking out of your wall. This is where your sink finally joins the home’s main plumbing.
Slide the trap arm into the wall fitting, then connect its other end to the P-trap. You may need to trim the arm with a hacksaw if it’s too long. Measure twice and cut slowly for a clean edge.
Slip a washer and slip nut onto each joint before pushing the pieces together. Aim for a slight downward slope toward the wall so water drains smoothly. That gentle tilt, just a quarter inch or so, keeps everything flowing without pooling inside the pipes.
Step 6 – Tighten all the slip nuts
Now bring everything together. Work your way through each connection, hand-tightening the slip nuts first so the threads catch cleanly without cross-threading.
Once they’re all hand-snug, follow up with your slip-joint pliers. Turn each nut just a quarter to half turn past hand-tight. Plastic fittings strip easily, so resist the urge to muscle them down hard.
As you tighten, double-check that the P-trap stays level and the tailpiece remains straight. Pipes have a habit of shifting as you crank. Listen for that soft squeak of the washer compressing into place, which means you’ve got a solid seal. When every nut feels firm and the whole assembly holds steady, you’re nearly done.
Step 7 – Run a leak test
This step tells you whether all your hard work paid off. Place your dry bucket back under the trap, just in case, and grab a few paper towels.
Turn on the cold water and let it run steadily down the drain. Watch every joint closely. Run your fingertip along the underside of each connection and feel for moisture.
Then fill the sink basin halfway and pull the stopper. This bigger rush of water puts real pressure on your connections, exposing any weak seals. If you spot a drip, dry the area and tighten that specific slip nut a touch more. A thorough leak test now saves you from water damage and frustration later.
Step 8 – Final check and cleanup

With no leaks in sight, give everything one last look. Confirm the P-trap holds water, the slope of your trap arm runs toward the wall, and no nut feels loose.
Wipe down all the pipes with a dry rag so you’ll easily notice future drips against the clean surface. Tidy up your tools and return your supplies to the cabinet.
Take a moment to appreciate your work. Mastering how to hook up a kitchen sink drain is a genuine accomplishment, and your sink should now drain quietly and cleanly. Run the water one final time, listen to it flow, and enjoy the satisfaction of a job done with your own two hands.
Critical Mistakes When Hooking Up a Kitchen Sink Drain
Even careful beginners hit a few common snags, so it helps to know what to watch for.
The biggest mistake is overtightening slip nuts. Most modern fittings are plastic, and they crack under too much force. A cracked nut leaks no matter how hard you twist it, so stop at firm and resist the urge to wrench down harder.
Another frequent error is forgetting the washers or installing them backward. Washers create the watertight seal between joints. Skip one, and you’ll chase a stubborn drip for hours. Always check that the beveled edge faces the right direction toward the connection.
Many people also skimp on the plumber’s putty around the drain basket. Too little putty leaves gaps, and water seeps under the sink where you can’t see it until the cabinet bottom warps. Use enough to see that telltale squeeze-out.
Finally, folks often set the trap arm with no downward slope. A flat or uphill pipe traps water and food debris, leading to slow drains and bad smells. Give it that slight tilt toward the wall, and skipping the leak test only compounds these problems.
Expert Tips
A little extra know-how goes a long way under the sink. Keep these pointers in mind as you work.
Always dry-fit the entire assembly before sealing or tightening anything. This lets you spot misalignments while it’s still easy to adjust them.
Buy a spare set of washers and slip nuts when you shop. They cost almost nothing, and having extras means one stripped nut won’t derail your whole project.
If your connections still seep after tightening, try wrapping the threaded joints with a couple of layers of plumber’s tape. It fills tiny imperfections and helps create a tighter seal.
Finally, snap a quick photo of the original setup before you take anything apart. That reference picture makes reassembly far less confusing, especially if you get interrupted halfway through.
Frequently Asked Questions
Do I need plumber’s putty or silicone for the drain basket?
Either works well, but they behave differently. Plumber’s putty stays soft and is easy to remove later, which makes it the traditional choice for drain baskets. Silicone forms a permanent, waterproof bond and never dries out. For a standard kitchen sink, putty is beginner-friendly and forgiving. Just avoid putty on certain stone or composite sinks, where it can leave stains.
Why does my P-trap keep leaking after I tighten it?
A persistent leak usually points to one of these causes:
- A missing or misaligned washer inside the joint
- An overtightened nut that has cracked
- Cross-threaded slip nuts that won’t seal evenly
- A trap that sits crooked, pulling on the connection
Loosen the joint, inspect each washer, and reassemble slowly. Hand-tighten first, then add just a slight turn with pliers.
How long does it take to hook up a kitchen sink drain?
Most beginners finish in about one to two hours. If you’ve done it before, expect 30 to 45 minutes. The timing depends on whether you’re working with new parts or removing old, corroded ones. Take your time with the dry-fit and leak test rather than rushing. A careful first attempt saves you from redoing the job later.
Can I reuse my old P-trap and slip nuts?
You can, but it’s often not worth it. Old plastic nuts grow brittle, and rubber washers harden and lose their seal over time. Metal traps may show corrosion or thin spots. Since a fresh P-trap kit is inexpensive, replacing it gives you new washers and reliable threads. If your existing parts look clean and flexible, reusing them is fine.
What size pipes do I need for a kitchen sink drain?
Standard kitchen sink drains use a 1½-inch tailpiece and P-trap, while the drain basket opening is typically 3½ inches across. Always check your existing setup before buying, since older homes occasionally use different sizes. Bring your old parts to the store for an easy match, or measure the diameter of the pipes yourself with a tape measure.
Conclusion
Connecting your sink drain isn’t the mysterious, plumber-only task it might seem at first. Once you break it down, it’s really just a series of pipes that twist, slide, and tighten together. You’ve now seen how the drain basket, tailpiece, P-trap, and trap arm all fit into one smooth-flowing system.
Remember the essentials: seal the basket with enough plumber’s putty, line up your washers correctly, hand-tighten before reaching for pliers, and never skip the leak test. Give that trap arm a gentle slope toward the wall, and you’ll avoid the most common headaches.
The real reward goes beyond a working sink. You’ve added a practical skill to your toolkit, saved the cost of a service call, and proved you can tackle home repairs yourself. That confidence carries into your next project.
So roll up your sleeves and put this knowledge to use. Now that you know how to hook up a kitchen sink drain, you can keep your kitchen running smoothly for years to come.

About
Nick Hall has spent the last seven years working at the intersection of kitchen design and home repair — first as a design assistant at a residential renovation studio, then as a freelance writer covering everything from cabinet layouts to leaky faucet fixes.
Her approach is simple: kitchens should look good and function well. That means she’s just as comfortable talking about color palettes and counter materials as she is walking readers through how to fix a wobbly cabinet hinge or troubleshoot a garbage disposal.
Nick has worked directly with homeowners on small-space kitchen makeovers, budget-conscious renovations, and the kind of everyday repairs that don’t need a contractor — just the right instructions. She writes from experience, not theory, and tests most of the fixes and tips she shares before publishing them.
When she’s not writing, Nick is usually hunting for mid-century kitchen finds at estate sales or helping friends plan their own renovations. She lives in Columbus, Ohio.