
That first cup of coffee in the morning sets the tone for your whole day. When it tastes smooth, rich, and just right, everything feels a little easier. But a great cup starts with knowing your machine.
Plenty of beginners pour in water, dump in some grounds, and hope for the best. Then they wonder why their coffee comes out weak, bitter, or overflowing onto the counter.
The good news? Brewing a perfect pot is simpler than you think. Once you learn how to use coffee maker with filter the right way, you’ll get a clean, flavorful cup every single time.
No barista training required. With a few easy habits, you’ll brew like a pro.
This guide walks you through the whole process step by step, so you can make reliable, delicious drip coffee with total confidence.
Why Learning to Use a Coffee Maker With Filter Matters
If you brew coffee in small or shared spaces, this skill is a real lifesaver. A filter coffee maker shines in cabins, RVs, and busy shared kitchens where you want a dependable cup without fuss.
Picture a quiet morning at a cabin with limited gear. A simple drip machine and a stack of paper filters give you fresh coffee without hauling tons of equipment.
For campers and outdoor beginners, the routine stays easy. You measure, pour, and brew, then clean up in minutes with no messy grounds floating around.
It also cuts down on waste. With the right coffee-to-water ratio, you brew exactly what you need and skip wasted beans.
Master this once, and you’ll have a steady morning routine that works almost anywhere you go.
Tools and Materials You’ll Need
Before you brew, gather a few basics. You likely own most already, and nothing here costs much. Having everything ready keeps your morning smooth.
Here’s what to grab:
- A drip coffee maker with a brew basket
- Paper filters sized to fit your machine
- Fresh ground coffee
- A coffee scoop or tablespoon for measuring
- Clean, cold water for the reservoir
- The carafe that came with your machine
- A damp cloth for quick cleanup
- Optional: A reusable filter, which saves money and cuts paper waste over time
Set these out before you start. Check that your paper filters match your basket shape, since the wrong size can fold or collapse mid-brew. A little prep now means a better cup and far less mess later.
Step-by-Step Guide on How To Use Coffee Maker With Filter
Step 1 – Fill the Water Reservoir
Start with clean, cold water, since it makes the freshest-tasting brew. Open the lid on the back of your machine to reveal the water reservoir.
Pour your water in slowly, watching the marked lines on the side. These markers match the number of cups you want, so fill to the right level for your batch.
Cold tap water works fine for most people, though filtered water gives an even cleaner taste. You’ll hear the gentle splash as it settles into the tank.
Avoid overfilling past the top line, or you risk an overflow onto your counter. Close the lid snugly once you’re done. Getting the water right is the foundation for a balanced, satisfying cup of drip coffee.
Step 2 – Place the Paper Filter Correctly
Now slide open or lift out the brew basket. Take one paper filter and open it up fully, smoothing the seams so it sits flat against the sides.
Settle it into the basket so it hugs the shape snugly. Knowing how to use coffee maker with filter well starts right here, because a poorly seated filter can collapse and spill grounds into your pot.
Press it down gently with your fingers to seat it firmly. If the edges flop inward, straighten them so the top stays open and round.
A quick tip: pre-wet the filter with a splash of hot water to help it cling to the basket. This small step keeps everything stable once the brew cycle begins.
Step 3 – Measure Your Ground Coffee
Here’s where flavor really comes from. Scoop your ground coffee into the filter, using a level coffee scoop or tablespoon to stay consistent.
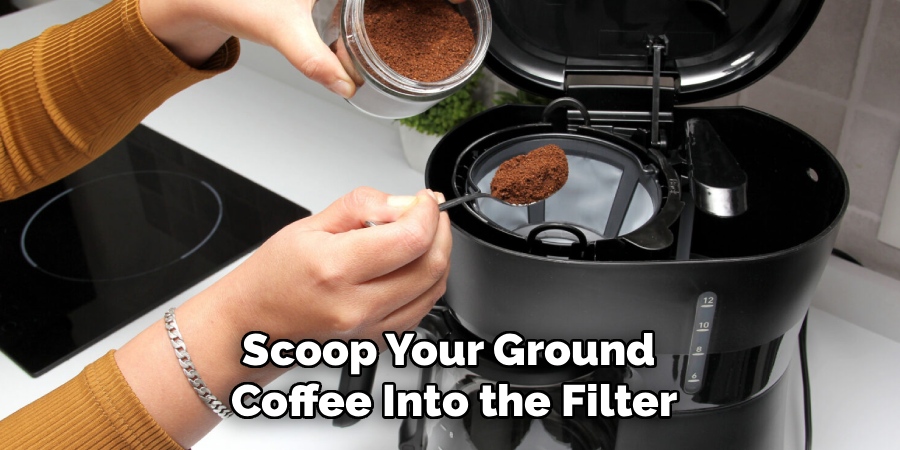
A good starting point is one to two tablespoons per six ounces of water. Adjust to your taste, but keep that coffee-to-water ratio in mind for balance.
Too little gives you weak, watery coffee. Too much leads to a strong, bitter taste that overwhelms the cup. Measuring carefully takes the guesswork out.
Give the basket a gentle shake to level the grounds evenly. You’ll catch that rich, earthy aroma rising up, a sweet preview of what’s coming. Consistent scooping each morning means you’ll dial in your perfect strength fast.
Step 4 – Check the Brew Basket Alignment
Before you start brewing, slide the brew basket back into place. This step is easy to rush, but it matters more than you’d think.
Make sure the basket sits flush and locks in fully. If it’s tilted or only half-seated, water can bypass the grounds or leak out the side.
Look for the basket to click or settle squarely into its slot. Run a finger around the edge to confirm nothing is catching or pinched.
Some machines have a drip stop that only works when the basket is aligned right. A misaligned basket can trigger an overflow or a messy puddle. Take two seconds to double-check, and you’ll avoid a frustrating cleanup later on.
Read more : How To Clean A GE Oven
Step 5 – Position the Carafe on the Hot Plate
Set your empty carafe squarely on the hot plate beneath the basket. The lid should face the machine so brewed coffee drips straight in.
Center it carefully so the stream of coffee lands inside, not on the plate. A crooked carafe can cause drips and a sticky mess.
Check that the carafe lid is on properly, since many machines rely on it to push open the drip stop valve. Without it seated right, coffee may back up in the basket.
You’ll feel the hot plate begin to warm as the machine heats. That gentle warmth keeps your coffee hot after brewing. A well-placed carafe means every drop ends up in your cup where it belongs.
Step 6 – Start the Brew Cycle
Now for the fun part. Press the power or brew button, and listen for the soft gurgle as the machine wakes up.
Within moments, hot water rises and begins dripping over the grounds. The kitchen fills with that warm, comforting coffee aroma you love.
Let the brew cycle run fully without lifting the lid or pulling the carafe early. Interrupting it can cause uneven flavor or a drip onto the hot plate.
Watch the carafe slowly fill with rich, dark coffee. The steady trickle tells you everything is working as it should.
Most machines finish a full pot in a few minutes. Resist the urge to rush; patience here rewards you with a smooth, even cup.
Step 7 – Serve and Keep It Fresh
Once the dripping stops and the gurgling fades, your coffee is ready. Lift the carafe by its handle and pour yourself a steaming cup.
Hold the carafe steady and pour slowly to avoid splashes. That first sip should taste smooth and balanced, not harsh or watery.
If you’re not drinking it all at once, leave the carafe on the hot plate to stay warm. Just don’t let it sit too long, or it may turn bitter and overcooked.
For longer storage, pour leftover coffee into a thermal carafe instead. This keeps the flavor fresh without scorching it. Enjoy your cup while it’s hot, and savor the reward of a brew you made just right.
Step 8 – Clean Up After Use
Cleaning right away keeps your machine fresh and your next cup tasting great. Once things cool, lift out the brew basket and toss the used paper filter with the grounds.
Rinse the basket under warm water to clear away any leftover residue. If you used a reusable filter, scrub it gently and let it air dry.
Wipe down the carafe and the hot plate with a damp cloth. A quick swipe now stops sticky buildup later.
Every few weeks, descale your machine to clear mineral buildup from the water reservoir. Run a mix of vinegar and water through a brew cycle, then rinse with clean water. Regular cleaning means better flavor and a machine that lasts for years.
Critical Mistakes When Using a Coffee Maker With Filter
Even a simple machine has a few traps, so let’s cover the slip-ups that catch beginners. The most common mistake is using the wrong coffee-to-water ratio. Scoop too little, and you get weak coffee that tastes like dishwater. Add too much, and you’re left with a bitter, overpowering cup. Measure carefully each time, and you’ll nail your perfect strength.
Another frequent error is seating the paper filter poorly. If it folds or collapses during brewing, grounds spill into your pot and ruin the taste. Always smooth the filter into the basket, and pre-wet it to help it stay put.
Many people also forget to align the brew basket fully. A tilted or half-seated basket can trigger an overflow, sending hot coffee across your counter. Take a second to lock it in squarely before you brew.
Skipping regular cleaning causes trouble too. Old residue and mineral buildup in the water reservoir lead to off-flavors and slow brewing. Descale your machine every few weeks to keep it running well.
Finally, don’t pull the carafe mid-brew. The drip stop holds coffee back, but yanking it early leaves a mess on the hot plate.
Expert Tips
Want the best cup possible? Start with fresh ground coffee, since beans lose flavor fast once they’re open. Store them in an airtight container away from light and heat.
Pre-wet your paper filter with hot water before adding grounds. This rinses away any papery taste and helps the filter cling to the basket.
Use filtered or bottled water if your tap water tastes off. Cleaner water makes noticeably smoother coffee.
Warm your carafe with a splash of hot water before brewing. This keeps your coffee hotter, longer.
Finally, clean your machine on a schedule. A quick rinse after each use plus a monthly descale prevents mineral buildup and keeps every cup tasting bright and fresh.
Frequently Asked Questions
Can I use a coffee maker without a paper filter?
Yes, if your machine supports it. Many drip coffee makers work with a reusable filter, which sits right in the brew basket like a paper one. Just rinse it after each use. If you skip a filter entirely, grounds will end up in your cup, leaving a gritty, muddy texture. So always use either a paper filter or a reusable filter for a clean, smooth brew.
How much coffee should I use per cup?
A good rule is one to two tablespoons of ground coffee for every six ounces of water. Adjust to your taste from there:
- Use one tablespoon for a milder, lighter cup
- Use two tablespoons for a bolder, stronger brew
Keep your coffee-to-water ratio consistent each morning, and you’ll quickly find the strength you love. Measuring with a scoop beats guessing every time.
Why does my coffee overflow during brewing?
Overflow usually means the brew basket or filter isn’t seated right. If the paper filter collapses or folds, water pools and spills over. A tilted basket can do the same. Smooth the filter into place, pre-wet it so it clings, and lock the basket in squarely. Also avoid overfilling the water reservoir past the top line. These small checks stop messy overflows for good.
How often should I clean my coffee maker?
Rinse the brew basket and wipe the carafe after every use to prevent residue buildup. Then descale the whole machine every few weeks to clear mineral buildup from the water reservoir. Just run a mix of vinegar and water through a full brew cycle, then run clean water through twice to rinse. Regular cleaning keeps your coffee tasting fresh and helps your machine last much longer.
Why does my coffee taste bitter?
Bitter coffee often comes from too many grounds, water that’s too hot, or letting the carafe sit too long on the hot plate. Try using slightly less ground coffee and adjusting your ratio. Don’t leave brewed coffee warming for hours, since it overcooks and turns harsh. Also clean your machine regularly, because old residue and mineral buildup can add an unpleasant, bitter taste.
Conclusion
Brewing great coffee really comes down to a few simple habits. Fill the water reservoir with clean water, seat your filter snugly, measure your grounds, and keep your machine clean. Do that, and you’ll pour a smooth, flavorful cup every single morning.
Keep these takeaways in mind:
- Use the right coffee-to-water ratio for balanced flavor
- Seat the paper filter properly so it won’t collapse
- Align the brew basket fully to avoid overflow
- Clean after use and descale regularly to fight mineral buildup
These small steps make a big difference, whether you’re brewing in a cozy cabin, a compact RV, or a busy shared kitchen.
Now that you understand how to use coffee maker with filter the right way, put it to work with your next pot. You’ll enjoy a rich, satisfying cup, an easy cleanup, and the quiet pride of doing it all yourself. Happy brewing, and savor every warm sip!

About
Nick Hall has spent the last seven years working at the intersection of kitchen design and home repair — first as a design assistant at a residential renovation studio, then as a freelance writer covering everything from cabinet layouts to leaky faucet fixes.
Her approach is simple: kitchens should look good and function well. That means she’s just as comfortable talking about color palettes and counter materials as she is walking readers through how to fix a wobbly cabinet hinge or troubleshoot a garbage disposal.
Nick has worked directly with homeowners on small-space kitchen makeovers, budget-conscious renovations, and the kind of everyday repairs that don’t need a contractor — just the right instructions. She writes from experience, not theory, and tests most of the fixes and tips she shares before publishing them.
When she’s not writing, Nick is usually hunting for mid-century kitchen finds at estate sales or helping friends plan their own renovations. She lives in Columbus, Ohio.