
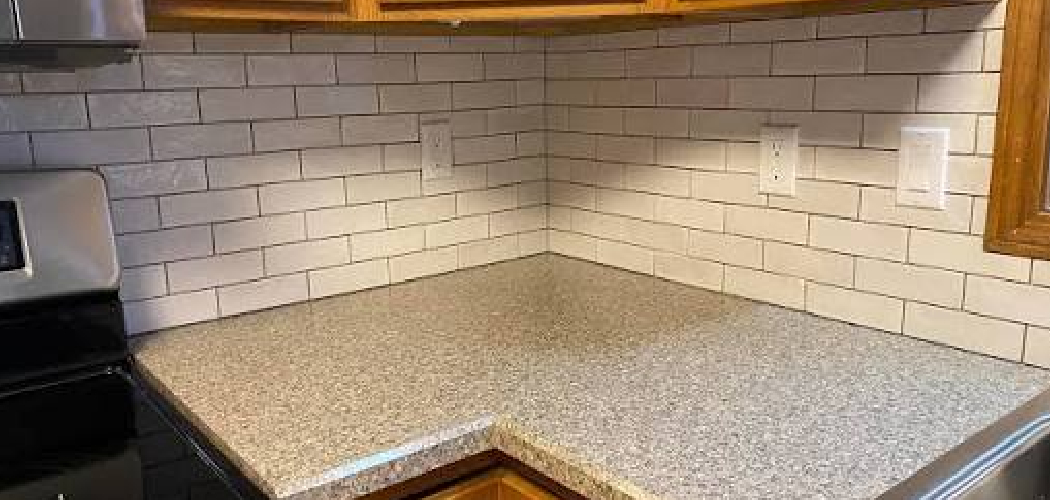

Corners are where most tiling projects either shine or fall apart. They’re tricky, a little intimidating, and the spot where beginners tend to freeze up. But here’s the truth: with the right approach, corners are completely manageable, even on your first try.
A clean corner makes your whole backsplash look professional. A sloppy one draws the eye for all the wrong reasons. The good news is that you don’t need years of experience to get crisp, watertight edges.
Learning how to tile corners in kitchen spaces gives you control over the trickiest part of any tile job, so the rest feels easy by comparison.
This guide walks you through every step, from prepping your walls to caulking the final joint, so you can wrap a corner cleanly and feel proud of the result.
Why Tiling Kitchen Corners Matters
This skill stretches far beyond a standard home kitchen. If you own an RV or live the van life, every inch of wall counts, and corners take a beating from moisture and movement. A tight, sealed corner protects the substrate behind it and keeps water from sneaking in.
Cabin owners and outdoor kitchen builders face the same challenge. Semi-outdoor cooking spaces deal with humidity, splashes, and temperature swings, so clean tile edges mean easier cleaning and fewer grime traps.
For beginners working in compact spaces, mastering corners builds real confidence. You learn how tiles meet, where to place an expansion joint, and how a proper caulk bead handles movement.
Best of all, you gain self-reliance. Once you can wrap a corner cleanly, no tiling project feels out of reach again.
Tools and Materials You’ll Need
You won’t need a contractor’s van full of gear for this job, just a focused set of reliable tools.

Start with a notched trowel for spreading thinset mortar and a grout float for packing joints later. A tile cutter handles straight cuts, but a wet saw makes cleaner, faster work of corners and tight fits. Keep tile spacers on hand for even grout lines, along with a measuring tape, pencil, and a good level to keep everything square.
You’ll also want tile adhesive or thinset, grout, and caulk for the movement joints. Grab a sponge, a couple of buckets, and trim pieces or edge profiles to finish exposed edges cleanly. Don’t skip safety glasses, especially when cutting.
One optional convenience item worth grabbing is a corner trowel, which smooths inside corner adhesive beautifully and saves you fussing with a flat blade. Lay your tiles out on the counter first, including spacers, to see how they’ll fall.
Step-by-Step Guide on How To Tile Corners in Kitchen
Step 1 – Prep and Clean the Wall Surfaces
Before any tile goes up, your walls need to be clean, dry, and solid. Run your hand across the surface and feel for dust, grease, or flaking paint. Any of these will stop your thinset from gripping.
Wipe down the substrate with a damp cloth and let it dry fully. If you spot glossy paint, scuff it lightly so the adhesive can bite. Fill small dents or holes and smooth them flush.
Check that the wall is sound and not crumbling, especially near the corner where two surfaces meet. A shaky base means shaky tiles.
Take a moment to feel the corner itself. Is it a true 90 degrees? Knowing this now saves you headaches when you start wrapping tiles around it later.
Step 2 – Measure and Dry-Fit Around the Corner
Now grab your measuring tape and pencil. Measure the wall height and width on both sides of the corner, then mark a level reference line. This line keeps your rows straight even if the countertop or floor isn’t.
Lay your tiles out on the counter first, including spacers, to see how they’ll fall. This dry run shows you exactly where cuts land and whether a tiny, awkward sliver will end up right at the corner.
Pay close attention to the inside corner or outside corner you’re working with. Each behaves differently. Shuffle the layout until your backsplash layout looks balanced, with cut tiles tucked into less visible spots rather than front and center.
Step 3 – Plan the Layout and Mix the Adhesive
With your dry run done, lock in your plan. Decide which wall you’ll tile first, usually the more visible side, and how the tiles will meet at the corner. For an outside corner, decide now whether you’ll use tile edge trim, bullnose tile, or overlap the edges.
Mastering how to tile corners in kitchen layouts really comes down to this planning moment, so don’t rush it.
Now mix your thinset mortar. Add powder to water slowly, stirring until it reaches a smooth, peanut-butter consistency. It should cling to your trowel without sliding off.
Let it slake, or rest, for the time on the bag, then stir once more. Mix only what you can use in about thirty minutes.
Step 4 – Spread Thinset and Place the First Tiles
Scoop thinset onto your notched trowel and spread it on the wall at a firm angle. You’ll feel the trowel teeth drag, leaving even ridges that grip the tile. Cover only a small section at a time so the adhesive doesn’t skin over before you reach it.
Press your first tile firmly onto the wall with a slight twist. Feel it settle into the ridges. Pop in your spacers and set the next tile beside it.

Work outward from your reference line, checking each tile sits flush with its neighbors. Wipe away any thinset that squeezes up into the grout line right away.
Keep your rows tight and even as you build toward the corner.
Step 5 – Wrap the Corner and Cut Tiles for Tight Fits
Here’s the moment that matters most. As you reach the corner, decide how the tiles meet. On an outside corner, slip in your tile edge trim or corner bead for a crisp, protected edge. On an inside corner, let the tiles from each wall meet with a small gap for caulk later.
Measure each corner tile individually, since walls are rarely perfectly square. Mark your cut line in pencil, then trim with your wet saw for a clean edge.
Dry-fit each cut piece before setting it in adhesive. Slide it into place and check the fit feels snug but not forced. A forced tile cracks or pushes its neighbors out of line, so aim for gentle precision here.
Step 6 – Check Level, Spacing, and Let It Cure
Step back and look at your work. Lay your level across the tiles both horizontally and vertically. The corner is where misalignment shows most, so check it twice.
Run your fingers across the tile faces. Feel for any piece sitting proud or sunken compared to its neighbors. Nudge stragglers back into line while the thinset is still workable.
Confirm your spacers sit evenly and every grout line looks consistent. Wipe out any adhesive lurking in the joints with a damp sponge, since dried thinset there ruins your grout finish.
Now walk away. Let the adhesive cure fully, usually twenty-four hours. Resist the urge to rush this. Grouting too soon loosens tiles and undoes your careful work.
Step 7 – Grout the Joints and Clean the Haze
Once the adhesive is rock-solid, remove your spacers. Mix your grout to a thick, smooth paste, then load your grout float.
Hold the float at a forty-five degree angle and press grout firmly into each joint. Work diagonally across the tiles so you don’t drag grout out of the lines. You’ll feel the joints fill and firm up beneath the float.
Wait about ten minutes until the grout sets slightly. Then wipe the surface with a damp, well-wrung sponge in gentle circles. Rinse often and don’t flood the joints.
A hazy film will appear as the surface dries. Buff it away with a clean, dry cloth once the grout firms up. Leave the corner joints empty, since those get caulk instead.
Step 8 – Caulk the Movement Joints and Inspect
Corners need flexibility, not rigid grout. That’s where caulk earns its place. Tape both sides of the inside corner for a clean line, then run a steady caulk bead down the joint where the two walls meet.
Smooth the bead with a damp fingertip in one confident pass. You’ll feel it flatten into a neat, slightly concave line. Pull the tape away immediately while the sealant is wet for crisp edges.
Do the same at any expansion joint where tile meets the countertop or another surface. These flexible seams absorb movement so your tiles don’t crack.
Finally, inspect everything. Check for gaps, smudges, or missed spots. Run your hand over the corner and admire that smooth, sealed, professional finish you just created.
Critical Mistakes When Tiling Kitchen Corners
A few common slip-ups catch beginners at the corner, so let’s clear them up early.
The biggest mistake is forcing the corner with full, uncut tiles. Walls are rarely perfectly square, so trying to butt two full tiles together usually leaves an ugly gap or a tile that bows outward. Always measure each corner tile individually and cut for a precise fit, even if it means trimming just a sliver.
Another frequent error is grouting the corner joint instead of caulking it. Rigid grout in a corner cracks as your home naturally shifts and expands. Corners and expansion joints need a flexible caulk bead that moves with the structure, not a hard grout line that splits within months.
Many people also rush the curing time. Grouting before the thinset fully sets shifts tiles out of line and weakens the bond. Patience here protects all your careful work.
Finally, plenty of folks ignore the dry run and skip planning the layout. They start tiling from a random spot, then end up with a paper-thin, awkward tile sliver right at the corner. A quick dry-fit shows you where cuts land, so you can balance the layout before any adhesive touches the wall.
Expert Tips
Want a smoother, sharper result? Always start tiling from your most visible wall and push the cut tiles toward the less noticeable side. Your eye forgives a cut tucked in a shadowy corner far more than one front and center.
Keep a damp sponge and a bucket of clean water within arm’s reach the entire time. Wiping thinset and grout while they’re fresh saves you serious scrubbing later.
For outside corners, tile edge trim gives you a clean, durable edge without fussing over perfectly mitered tiles. It’s a beginner’s best friend.
When caulking, match your sealant color to your grout for a seamless look. And run a fan in the room to help adhesive and grout cure evenly, especially in humid or semi-outdoor spaces.
Frequently Asked Questions
Should I Grout or Caulk Inside Corners?
Always caulk inside corners rather than grout them. Grout is rigid, so it cracks when your walls naturally shift, settle, or expand. A flexible caulk bead moves with that motion and keeps the joint sealed against moisture. For the best look:
- Match your caulk color to your grout
- Tape both edges for a clean line
- Smooth the bead with a damp fingertip
This combo gives you a watertight, professional corner.
How Do I Tile an Outside Corner Cleanly?
You have three solid options. The easiest for beginners is tile edge trim or corner bead, which gives a crisp, protected edge with no fussy cutting. Bullnose tile offers a rounded, finished look. The most advanced method is mitering both tile edges at forty-five degrees for a seamless wrap. Trim is the most forgiving, so start there if this is your first project.
Do I Need a Wet Saw to Tile Corners?
Not always, but it helps enormously. A manual tile cutter handles straight cuts on standard wall tile just fine. However, corners often need precise, narrow cuts and notches that a wet saw makes cleaner and faster. If you’re tiling stone, porcelain, or thick tile, a wet saw is well worth renting for the day to avoid cracked, jagged edges.
How Long Should Adhesive Cure Before Grouting?
Give thinset mortar at least twenty-four hours to cure before you grout, though some products need longer. Check the bag for exact times. Grouting too early shifts your tiles and weakens the bond, undoing your careful alignment. Cooler or humid spaces, like cabins and outdoor kitchens, may need extra time. When in doubt, wait. Patience here protects the whole project.
How Do I Stop Tiles From Slipping at the Corner?
Slipping usually means too much adhesive or skipped spacers. Keep these in mind:
- Spread thinset in even ridges, not thick globs
- Press tiles with a slight twist to seat them
- Use spacers on every joint, including the corner
If a tile still slides, a few strips of painter’s tape will hold it steady while the adhesive sets.
Conclusion
Corners really are the make-or-break moment of any tiling project, and now you know they’re nothing to fear. With careful prep, a smart layout, and a little patience, you can wrap a corner cleanly and give your whole backsplash that polished, professional look.
Remember the key steps. Clean and prep your walls, measure and dry-fit around the corner, then plan your layout before mixing any adhesive. Spread your thinset evenly, place your tiles, and wrap the corner with trim or precise cuts. Check your level, let everything cure fully, then grout the joints and caulk the movement seams.
Knowing how to tile corners in kitchen spaces gives you a skill that pays off everywhere, whether you’re upgrading a home backsplash, fitting out an RV, or building an outdoor kitchen. You save money, skip the contractor, and gain real confidence with every tile you set.
So gather your tools, take it one corner at a time, and trust the process. When you run your hand along that smooth, sealed edge, you’ll know every careful step was worth it.

About
Nick Hall has spent the last seven years working at the intersection of kitchen design and home repair — first as a design assistant at a residential renovation studio, then as a freelance writer covering everything from cabinet layouts to leaky faucet fixes.
Her approach is simple: kitchens should look good and function well. That means she’s just as comfortable talking about color palettes and counter materials as she is walking readers through how to fix a wobbly cabinet hinge or troubleshoot a garbage disposal.
Nick has worked directly with homeowners on small-space kitchen makeovers, budget-conscious renovations, and the kind of everyday repairs that don’t need a contractor — just the right instructions. She writes from experience, not theory, and tests most of the fixes and tips she shares before publishing them.
When she’s not writing, Nick is usually hunting for mid-century kitchen finds at estate sales or helping friends plan their own renovations. She lives in Columbus, Ohio.