
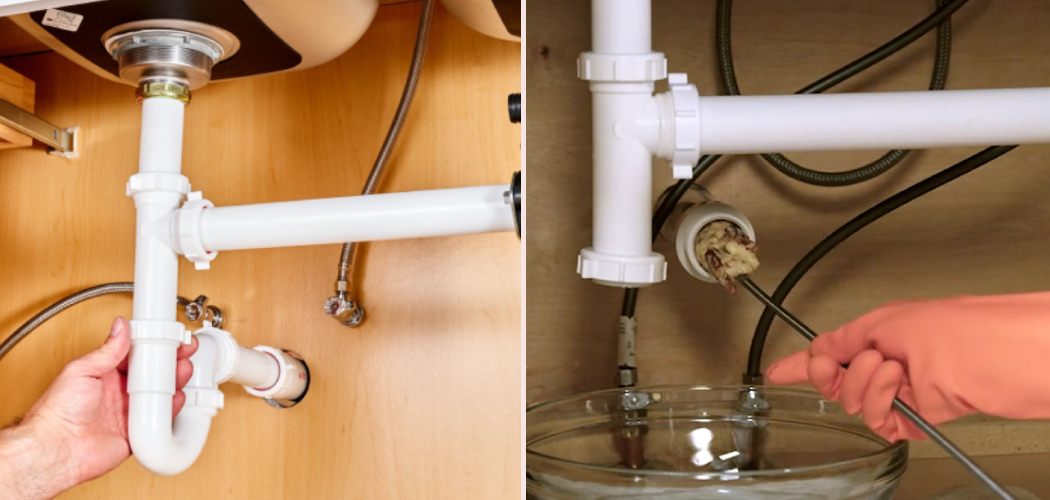
A leaking or slow kitchen sink drain can turn a simple cleanup into a messy, stressful chore. The good news is that many common drain problems are easier to fix than you might think, even if you have never handled plumbing repairs before. When you learn how to repair kitchen sink drain issues, you can save money, avoid water damage, and feel more confident handling small home repairs on your own.

Most kitchen drain problems come from loose slip nuts, worn washers, clogged trap sections, or cracked pipe fittings. This guide will walk you through the basics in a clear, beginner-friendly way so you can diagnose the issue, make the repair, and test your work safely.
Why Learning Kitchen Sink Drain Repair Matters
Knowing how to fix a kitchen sink drain gives you more control over one of the most-used parts of your home. A small drip under the sink can damage cabinets, create odors, and lead to mold if you ignore it for too long. A slow drain can also make cooking and cleanup harder than it needs to be.
This skill is especially useful if you spend time in cabins, RVs, camp kitchens, or other simple setups where plumbing issues may happen far from quick professional help. If you enjoy hands-on problem-solving, learning basic drain repair also builds confidence for other home maintenance tasks. Once you understand the trap, tailpiece, and drain connections, the whole system starts to feel much less intimidating.
Tools and Materials You’ll Need
Before you start, gather your tools so the job goes smoothly and you do not have to stop midway with water dripping into the cabinet.
- Bucket or shallow pan
- Old towels or rags
- Adjustable pliers or channel-lock pliers
- Pipe wrench if fittings are stuck
- Flashlight or work light
- Rubber gloves
- Replacement slip-joint washers
- Replacement nuts or drain pipe sections if damaged
- Plumber’s putty for basket strainer repairs
- Plumber’s tape for threaded connections where appropriate
- Small scrub brush or bottle brush
- Sponge for cleanup
- Mild cleaner to remove grime
- Optional: a phone camera to photograph the pipe layout before disassembly
Step-by-Step Guide on How to Repair Kitchen Sink Drain
Step 1 – Clear the Area and Set Up for a Clean Repair
Start by removing everything from under the sink. Pull out cleaning bottles, bins, and any shelf liners that might get wet. Place a bucket directly under the P-trap, then spread towels around the cabinet floor to catch drips and protect the wood.
Turn on the flashlight and look closely at every visible part of the drain assembly. You may see water stains, white mineral crust, or a dark damp ring around one fitting. These small clues help you narrow down the problem before you loosen anything. A dry paper towel rubbed along each joint can also reveal the exact leak point faster than your eyes alone.
Step 2 – Identify Whether the Problem Is a Leak, Clog, or Failed Seal
Not every drain repair starts the same way, so take a minute to diagnose the issue. Fill the sink halfway with warm water, then let it drain while you watch the pipes below. Listen for gurgling, look for drips, and note whether water backs up or drains slowly.
If water leaks only when the sink is draining, the problem is usually in the drainpipe, trap, or slip-joint connection. If water appears around the sink basket, the seal under the strainer may have failed. If the sink empties slowly with no leak, food debris or grease buildup may be stuck in the trap. Learning how to repair kitchen sink drain problems starts with spotting which part of the system is actually causing trouble.
Step 3 – Loosen the Slip Nuts and Remove the Trap
Once you know the trouble area, begin with the P-trap. This curved section holds a bit of water to block sewer gas, but it also catches debris. Loosen the slip nuts by hand first, then use pliers if needed. Work slowly so you do not crack older plastic fittings.

As you remove the trap, expect a splash of cloudy water and bits of food waste to drop into the bucket. The smell may be unpleasant, especially if buildup has been sitting for a while. Check inside the trap for grease, sludge, or a solid blockage. If the trap is intact and only dirty, a good cleaning may solve both odor and drainage problems without any major part replacement.
Step 4 – Inspect Washers, Nuts, and Pipe Sections for Damage
With the trap off, inspect each connection point closely. Slip-joint washers should look smooth, even, and slightly flexible. If a washer is flattened, brittle, split, or crooked, it will not seal well. Look at the nuts too, since worn threads or hairline cracks can stop you from tightening the joint properly.
Run your fingers along the drainpipes and tailpiece. A damaged section may feel rough, warped, or weak around the edges. Even a small crack can leak more than you expect once water starts flowing. If one section looks stained or misshapen, replace it rather than trying to force it back into service. A clean, snug fit matters more than overtightening a bad part.
Step 5 – Clean the Parts and Replace What Is Worn
Wash the reusable parts with warm water and a brush. Scrub away grease film, old residue, and mineral buildup so the fittings can seat properly when you reassemble them. If grime stays on the pipe ends, the washer may not sit flush, which often leads to small but stubborn leaks.
Replace any damaged washers, cracked trap pieces, or bent extension tubes with matching parts. Bring the old piece to the hardware store if you are unsure about size. This is often the point where beginners fully understand how to repair kitchen sink drain setups, because the system makes more sense once the parts are in your hands. Keep each new washer facing the correct direction, with the tapered side seated toward the fitting.
Step 6 – Reassemble the Drain Without Overtightening
Put the drain back together in the same order you removed it. Start each slip nut by hand so the threads catch evenly. If a nut feels crooked or resists right away, back it off and try again. Cross-threaded fittings often leak and can ruin the connection.
Tighten the joints until they feel snug, then give them a small extra turn with pliers if needed. Do not force them hard. Plastic fittings can crack under too much pressure, and even metal parts can shift out of alignment. The goal is a straight, even seal. As you work, check that the trap lines up naturally with the wall drain and tailpiece instead of being pulled into place under tension.
Step 7 – Repair the Sink Basket Seal if the Leak Comes from Above
If water leaks from the top of the drain assembly where the sink empties, the basket strainer may need attention. Remove the lower hardware and push the strainer assembly free. Clean off old plumber’s putty, residue, and grime from both the sink surface and the strainer flange.
Roll fresh plumber’s putty into a rope and press it under the flange before setting the strainer back in place. Then reinstall the gasket and mounting hardware underneath. Tighten it evenly so the seal compresses without twisting. You may see a little putty squeeze out around the rim, which is normal. Wipe away the excess for a clean finish and make sure the basket sits flat against the sink.
Step 8 – Test the Repair and Check for Hidden Leaks
Now it is time to test everything. Dry all the pipes and fittings with a towel so fresh drips will be easy to spot. Run warm water in a slow stream first, then increase the flow. Watch each joint carefully with the flashlight.
Next, fill the sink and release a full basin of water at once. This stronger rush tests the repair under more realistic use. Touch each connection with a dry finger or paper towel. Even one drop means you still need a small adjustment. If a slip joint leaks, tighten it slightly and retest. If the leak continues, take it apart and check whether the washer is seated backward, uneven, or misaligned.
Common Mistakes When Repairing a Kitchen Sink Drain
One common mistake is skipping the diagnosis and taking apart the wrong section first. If the leak comes from the basket strainer but you only focus on the trap, you waste time and may miss the real cause. Always watch the drain while water runs so you can pinpoint the problem before disassembly.
Another mistake is reusing old washers that already look flattened or stiff. They may seem close enough, but worn seals fail fast once the drain is back in use. New washers are inexpensive, and they often make the difference between a lasting fix and another leak the next day.
Many beginners also overtighten fittings. It feels logical to crank down harder to stop a drip, but too much force can crack plastic nuts, distort washers, or throw the pipes out of line. A snug fit works better than brute strength.
Poor alignment causes trouble too. If the trap or extension pipe has to bend to meet the next fitting, the joint will stay under stress and leak sooner or later. Let the pieces sit in a natural position.
Finally, some people forget to test with a full sink of water. A repair may seem fine under a light stream but fail when a heavy flow moves through the drain. Always do a full test before putting everything back under the cabinet.
Expert Tips
Take a quick photo of the drain setup before you remove anything. That simple step can save you time when it is time to reassemble the trap, washers, and extension pieces. It is especially helpful if your sink has a double-basin setup or an extra dishwasher branch.
Keep a small assortment of slip-joint washers and nuts on hand. Kitchen drain repairs often stall because one inexpensive part is missing or the wrong size. Also, clean the cabinet floor completely before the final test. A dry surface makes even tiny leaks easier to spot.
If your pipes are very old, brittle, or corroded, replace more than the failed part if needed. A fresh washer on a cracked fitting is only a short-term fix. Think of the whole drain assembly as a connected system, not just one problem spot.
Frequently Asked Questions
Can I repair a kitchen sink drain without calling a plumber?
Yes, in many cases you can. Simple problems like a loose slip nut, clogged P-trap, worn washer, or failed basket strainer seal are often beginner-friendly repairs. If you work carefully, use the right replacement parts, and test the drain thoroughly, you can handle many common issues yourself. Call a plumber if the pipes are inside the wall, severely corroded, or still leaking after replacement.

How do I know if the P-trap is the problem?
The P-trap is often the issue when the sink drains slowly, smells bad, or leaks only while water is flowing. It is the curved pipe under the sink, and it catches both debris and water. If you notice buildup, trapped food, or dripping around the trap joints, that section deserves a close inspection and cleaning.
Should I use plumber’s tape on every drain connection?
No. Many kitchen sink drain connections use slip-joint washers, and those seals do not rely on plumber’s tape. Tape is more useful on certain threaded connections where the threads themselves need help sealing. If you add tape where it does not belong, the fitting may not seat properly. Follow the design of the connection rather than using one method everywhere.
Why is my kitchen sink drain still leaking after I tightened it?
A leak that stays after tightening usually means the problem is not simple looseness. The washer may be backward, cracked, pinched, or off-center. The fitting could also be cross-threaded or misaligned. Take the joint apart, inspect each part, clean the surfaces, and reassemble it carefully instead of tightening harder and hoping it seals.
When should I replace the whole drain assembly?
Replace the full assembly when multiple parts are worn, the pipes are brittle, the fittings are cracked, or corrosion has spread across several connections. If you keep fixing one leak after another, a full replacement often saves time and frustration. A new drain setup also gives you a cleaner, more reliable system that is easier to maintain over time.
Conclusion
Fixing a kitchen sink drain may seem messy at first, but the process is very manageable once you break it into simple steps. Start by spotting whether the problem is a clog, a loose connection, a worn washer, or a failed sink strainer seal. Then clean the parts, replace anything damaged, reassemble the drain carefully, and test it with both a light stream and a full basin of water.
The biggest keys to success are patience, good alignment, and resisting the urge to overtighten. Small details matter here. A properly seated washer or a straight pipe connection can solve a leak that seemed stubborn just minutes earlier.
Once you learn how to repair kitchen sink drain problems, you build a practical skill that saves money and helps you take better care of your home. The next time your sink starts dripping, draining slowly, or smelling off, you will know exactly where to begin.

About
Nick Hall has spent the last seven years working at the intersection of kitchen design and home repair — first as a design assistant at a residential renovation studio, then as a freelance writer covering everything from cabinet layouts to leaky faucet fixes.
Her approach is simple: kitchens should look good and function well. That means she’s just as comfortable talking about color palettes and counter materials as she is walking readers through how to fix a wobbly cabinet hinge or troubleshoot a garbage disposal.
Nick has worked directly with homeowners on small-space kitchen makeovers, budget-conscious renovations, and the kind of everyday repairs that don’t need a contractor — just the right instructions. She writes from experience, not theory, and tests most of the fixes and tips she shares before publishing them.
When she’s not writing, Nick is usually hunting for mid-century kitchen finds at estate sales or helping friends plan their own renovations. She lives in Columbus, Ohio.