
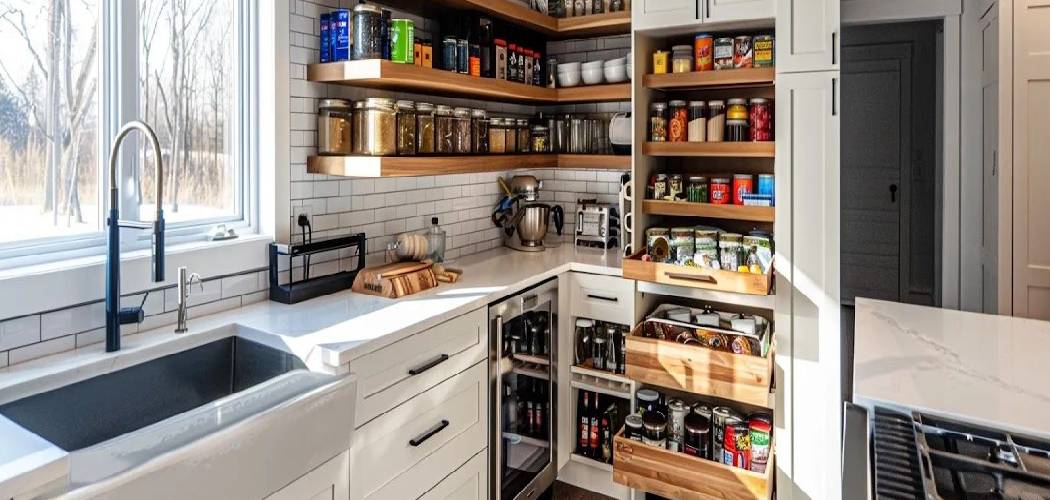
Not every kitchen comes with a roomy walk-in pantry, and that’s perfectly okay. If you’ve ever stared at a jumble of cans, boxes, and snack bags shoved into a cabinet, you already know the struggle. The good news? Your existing cabinets can do the job beautifully. Learning how to use kitchen cabinets as a pantry transforms cluttered shelves into a tidy, functional food zone you’ll actually enjoy opening.
You don’t need a renovation or a contractor to make this happen. With a little planning and a few smart tools, you can turn ordinary cabinets into organized storage that saves time and reduces waste.

This guide walks you through every step, from clearing and grouping to labeling and maintaining, so you can build a pantry that works for your space and your routine.
Why Using Kitchen Cabinets as a Pantry Matters
Setting up cabinet-based storage does more than tidy your kitchen. It builds real self-sufficiency. When you know exactly where your dry goods, canned goods, and snacks live, meal prep gets faster and grocery trips get smarter. You stop buying duplicates and start using what you already own.
These same organization habits carry over far beyond your kitchen walls. The skills you build here, like grouping items, packing efficiently, and managing tight spaces, translate directly to RV trips, cabin stays, camping prep, or compact apartment living. Once you master fitting more into less, every small space feels manageable.
There’s also peace of mind. An organized cabinet means you can see your inventory at a glance, plan around it, and feel ready for busy weeks or unexpected guests. Good kitchen organization simply makes daily life smoother.
Tools and Materials You’ll Need
Before you dive in, gather a few helpers. Having everything ready makes the whole project flow without frustrating mid-task interruptions.
- Shelf risers – to create stacked levels and double your usable height
- Clear storage bins – for grouping snacks, packets, and loose items
- Airtight containers – to keep flour, sugar, pasta, and cereal fresh
- Labels and a marker – so everyone knows where things belong
- A measuring tape – to size your shelves and containers correctly
- A damp cloth and mild cleaner – for wiping shelves before restocking
- A small step stool – to safely reach high or deep shelves
- A lazy Susan turntable (optional) – great for corner cabinets or spinning easy access to oils, spices, and small jars
Keep these items nearby as you work. When your tools are within reach, the setup feels easy and surprisingly fun.
Step-by-Step Guide on How to Use Kitchen Cabinets as a Pantry
Step 1 – Empty and Clean Your Cabinets
Start with a clean slate. Pull everything out of the cabinets you’ve chosen, and lay it all on your counter or table. Yes, it’ll look like a mess at first, but that’s part of the process.
As you empty each shelf, wipe it down with a damp cloth and a little mild cleaner. Crumbs, sticky rings, and dust love to hide in the back corners. Getting rid of them now keeps your food zone fresh and pest-free.
Take a moment to breathe in that just-cleaned scent. It’s oddly satisfying. A spotless, dry shelf gives your new setup a solid foundation, and starting fresh helps you see exactly how much space you’re truly working with.
Step 2 – Sort and Declutter Your Food
Now face that pile head-on. Go through every item and check expiration dates as you sort. Toss anything stale, expired, or mysteriously old. You’ll likely find a few surprises hiding in the back.
Group similar items together as you go. Put canned goods in one pile, dry goods in another, snacks in their own spot, and baking supplies together. This grouping makes the next steps so much easier.

Be honest about what you actually use. That random sauce you bought once? If it’s untouched and expired, let it go. Decluttering now means you only store what matters. Knowing how to use kitchen cabinets as a pantry starts with keeping the right things and releasing the rest.
Step 3 – Plan Your Cabinet Zones
Before anything goes back, make a quick plan. Think about how you cook and reach for things daily. Items you grab often, like coffee, snacks, or breakfast goods, deserve prime spots at eye level.
Heavier items like canned goods and big jars belong on lower, sturdy shelves. Lightweight boxes and rarely used appliances can live up high. This zoning keeps everything safe and easy to grab.
Picture your morning rush. You want your hand landing on what you need without digging. Mapping zones now prevents that frustrating shuffle later. Walk through the layout in your mind, then jot a simple sketch if it helps. A little planning here pays off every single day you open those doors.
Step 4 – Add Shelf Risers and Organizers
Here’s where the magic happens. Slide shelf risers onto your deeper or taller shelves to create a second level. Suddenly, that wasted vertical space holds twice as much, and nothing hides behind a wall of cans.
Add clear storage bins to corral loose packets, snacks, and small bags. Pull-out style bins work wonders on deep shelves, letting you reach the back without unloading the front. A turntable in a corner spins hard-to-reach items right to your fingertips.
Feel how the cabinet starts to make sense as each piece clicks into place. Organizers turn chaotic depth into neat, visible rows. This step alone often doubles your storage and instantly improves visibility for everything you keep inside.
Step 5 – Transfer Dry Goods Into Airtight Containers
Boxes and bags waste space and let air spoil your food. Switch your flour, sugar, rice, pasta, cereal, and other dry goods into airtight containers instead. They stack neatly, stay fresh longer, and look wonderful lined up.
Choose square or rectangular containers when you can, since they fit together better than round ones. Match sizes to your shelf height so nothing sits awkwardly tall or short.
Run your hand along the smooth, uniform tops once they’re in place. It feels orderly and calm. Plus, clear containers let you spot when supplies run low at a glance. No more reaching for an empty cereal box. This small swap keeps pests out and freshness in, every time.
Step 6 – Arrange Items by Zone and Visibility
Time to load everything back in, following the plan you made. Place your daily-use items front and center at eye level where you’ll see them instantly. Tuck backups and overflow storage toward the back or up high.
Line up canned goods in tidy rows or stack them on a riser so labels face out. Group snacks in their bin, baking supplies together, and breakfast items in one easy reach.

Step back and look. Can you see most items without moving things around? Good visibility is the heart of a working pantry. When everything has a clear home and faces forward, you’ll cook faster, waste less, and feel a little proud every time you open the door.
Step 7 – Label Everything Clearly
Labels turn a good setup into a great one. Mark your airtight containers, bins, and shelf zones so everyone in the house knows where things go and where to return them.
Use clear, simple words like “Pasta,” “Snacks,” or “Baking.” If you want, add dates to containers so you track freshness easily. A label maker looks polished, but a marker and tape work just fine too.
There’s something deeply satisfying about a neatly labeled shelf. It removes guesswork and keeps your system intact long after setup day. Labels also help family members put things back correctly, which protects all your hard work. This tiny touch keeps your kitchen organization from slowly slipping back into chaos.
Step 8 – Maintain and Restock Regularly
Your new pantry needs a little ongoing love. Once a week, do a quick scan to spot low supplies and add them to your shopping list. This habit keeps you stocked without overbuying.
Every month or so, wipe shelves, check expiration dates, and re-sort anything that drifted out of place. It only takes a few minutes when you stay on top of it.
As you restock after grocery runs, rotate older items to the front and place new ones behind. This “first in, first out” trick prevents waste. Keep your containers refilled and your labels accurate. With small, regular upkeep, your cabinets stay tidy, functional, and genuinely enjoyable to use for years.
Critical Mistakes When Using Kitchen Cabinets as a Pantry
Even a great setup can go sideways if you fall into a few common traps. Knowing them ahead of time saves you frustration down the road.
The biggest mistake is ignoring vertical space. Many people stack items flat and leave half the shelf height empty above them. Without shelf risers or stackable containers, you waste valuable room and end up cramming things in. Use that height, and you’ll be amazed how much more fits.
Another frequent error is skipping the planning stage. When you toss everything back randomly, you lose visibility and constantly dig for what you need. Take time to zone your shelves by how often you reach for each item.
Overpacking deep shelves causes trouble too. Items pushed to the back get forgotten, expire, and turn into wasted money. Pull-out bins or turntables solve this beautifully by bringing the back forward.
Many beginners also forget to label, which means the system falls apart within weeks. And finally, neglecting maintenance lets clutter creep back in. A quick weekly check keeps everything running smoothly and your food fresh.
Expert Tips
Want your cabinets to function like a pro-designed pantry? A few small habits make a big difference.
First, group items in clear bins so you can lift out a whole category at once. Grabbing the entire “snacks” bin beats fishing for one bag buried in back.
Next, store heavier canned goods low and lighter items high. This keeps shelves stable and protects your back when you reach.
Always leave a little breathing room on each shelf. A packed cabinet looks impressive but makes daily access a chore. Some space keeps things easy to grab and return.
Finally, embrace the “first in, first out” rule during restocking. Move older items forward and tuck new ones behind. This single habit slashes food waste and keeps everything fresh, which is exactly what good meal prep depends on.
Frequently Asked Questions
How do I keep food fresh in cabinet storage?
Keep food fresh by transferring dry goods into airtight containers right after opening. These block air and moisture that cause staleness. A few extra tips help too:
- Store cabinets away from heat sources like the oven or dishwasher
- Check expiration dates monthly and rotate older items forward
- Keep shelves clean and dry to discourage pests
These small steps protect both flavor and freshness over time.
What’s the best way to organize deep cabinet shelves?
Deep shelves work best with pull-out bins or turntables that bring back items forward without unloading everything. Group similar foods in each bin so you grab whole categories at once. Add shelf risers to use vertical height, and keep frequently used items toward the front. This setup boosts visibility and stops food from getting lost and forgotten in dark back corners.
Do I need special containers, or will any work?
Any airtight container works, but a few choices make life easier. Square or rectangular shapes fit together better than round ones and save space. Clear containers let you see contents and spot low supplies instantly. Match container sizes to your shelf height so nothing wastes vertical room. Consistent sizes also stack neatly, giving your cabinets a clean, organized look that’s easy to maintain.
How do I stop my pantry cabinets from getting messy again?
Labels are your best defense. When every bin and container has a clear name, family members return items correctly. Do a quick weekly scan to tidy strays and note low supplies. Restock with the “first in, first out” method to keep things rotating. A monthly deeper check, where you wipe shelves and toss expired items, keeps your system working long term.
Can small kitchens really use cabinets as a pantry?
Absolutely. Small kitchens benefit most from smart cabinet storage. Use shelf risers, stackable airtight containers, and door-mounted organizers to squeeze out every inch. Zone your shelves by how often you reach for items, and keep overflow storage up high. With vertical space and clear bins, even one or two cabinets can hold a surprising amount while staying tidy and easy to navigate.
Conclusion
Turning your cabinets into an organized food zone is one of the most satisfying kitchen projects you can tackle. You don’t need a renovation or extra square footage, just a clear plan and a few smart tools. Start by emptying and cleaning, then sort, zone, and add risers and bins to maximize every inch.
Remember the habits that keep it working. Transfer dry goods into airtight containers, label everything clearly, and arrange items so you can see them at a glance. A quick weekly check and the “first in, first out” rule keep your system fresh and clutter-free for the long haul.
These same organizing skills serve you everywhere, from busy weeknight meal prep to packing for a camping trip or compact living setup. Once you know how to use kitchen cabinets as a pantry, you’ll wonder how you ever managed without the order and ease it brings. Grab your containers, pick your cabinets, and start today. Your tidier, smarter kitchen is just a few simple steps away.

About
Nick Hall has spent the last seven years working at the intersection of kitchen design and home repair — first as a design assistant at a residential renovation studio, then as a freelance writer covering everything from cabinet layouts to leaky faucet fixes.
Her approach is simple: kitchens should look good and function well. That means she’s just as comfortable talking about color palettes and counter materials as she is walking readers through how to fix a wobbly cabinet hinge or troubleshoot a garbage disposal.
Nick has worked directly with homeowners on small-space kitchen makeovers, budget-conscious renovations, and the kind of everyday repairs that don’t need a contractor — just the right instructions. She writes from experience, not theory, and tests most of the fixes and tips she shares before publishing them.
When she’s not writing, Nick is usually hunting for mid-century kitchen finds at estate sales or helping friends plan their own renovations. She lives in Columbus, Ohio.