
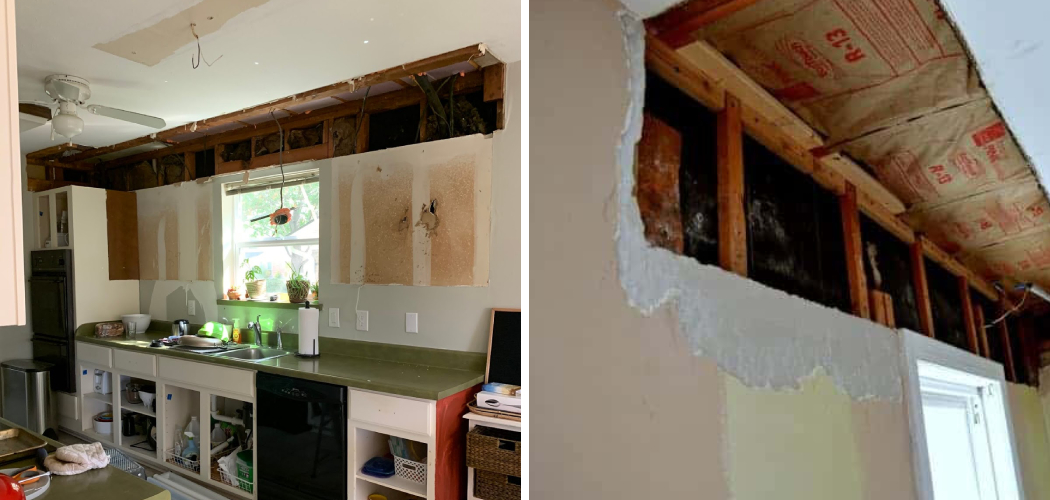
A kitchen soffit can make cabinets feel boxed in, darken the ceiling line, and limit your options for a cleaner, more open kitchen layout. It may look like a simple hollow bulkhead, but it can hide electrical wiring, a vent duct, plumbing, or framing lumber that supports nearby finishes. That is why learning how to remove soffit kitchen starts with careful inspection, not demolition.

For beginners, the job is manageable when you move slowly and treat each layer with respect. You will cut, check, remove, patch, and prepare the space one step at a time.
This guide explains how to inspect, open, remove, and finish a kitchen soffit while protecting your home and avoiding costly mistakes.
Why Learning to Remove a Kitchen Soffit Is Useful
Learning kitchen soffit removal gives you more control over storage, lighting, and layout. Many older kitchens have soffits above upper cabinets that hide dead space. Removing them can make room for taller cabinets, open shelving, recessed lighting, or a cleaner ceiling line.
This skill also helps DIY beginners understand what may sit behind drywall, including wall studs, duct runs, wiring, and plumbing. That knowledge matters during many home projects.
Renters should only attempt this with written permission. Campers and outdoor beginners can also use the same skills when updating cabin kitchens, RV-style prep areas, outdoor cooking stations, and off-grid setups where boxed-in overhead spaces may block airflow, reduce storage, or make a small space feel cramped.
Tools and Materials You’ll Need
Gather your tools before you start. A kitchen soffit can release demolition dust, sharp drywall edges, and old fasteners, so safety gear matters as much as cutting tools.
- Safety glasses
- Work gloves
- Dust mask or respirator
- Drop cloths or plastic sheeting
- Painter’s tape
- Stud finder
- Flashlight or headlamp
- Utility knife
- Drywall saw
- Pry bar
- Hammer
- Screwdriver or drill
- Oscillating tool
- Shop vacuum
- Ladder or sturdy step stool
- Patching compound
- Drywall tape
- Sanding sponge
- Contractor bags
- Optional convenience item: a zippered dust barrier for the kitchen doorway
You may also need wire caps, a voltage tester, or duct tape if you discover utilities inside the soffit.
8 Step-by-Step Guide on How to Remove Soffit Kitchen
Step 1 – Inspect the Soffit Before Cutting
Start with a slow visual inspection. Look at where the soffit meets the ceiling, walls, and upper cabinets. Notice whether it runs across one wall or wraps around corners. A long, continuous bulkhead may hide more than empty space.

Open nearby cabinets and look for screws, gaps, vents, or signs of older repairs. Use a flashlight to check for access panels or odd patches in the drywall. A soffit above a refrigerator, range, or sink may contain a vent duct, electrical wiring, or plumbing.
Tap the surface lightly. Hollow sounds may suggest empty framing, while dense or uneven sounds may point to pipes, ducts, or tight framing inside.
Step 2 – Shut Off Power and Protect the Kitchen
Before cutting into drywall, shut off power to nearby outlets, lights, and switches. Use a voltage tester if you have one. Even if the soffit does not appear to hold recessed lighting or wiring, nearby circuits may run through the same wall or ceiling space.
Cover counters, cabinet doors, appliances, and floors with drop cloths or plastic sheeting. Tape around cabinet edges to protect finishes from scratches. Drywall dust feels chalky and spreads fast, so close doors and cover nearby vents.
When planning how to remove soffit kitchen, treat dust control and surface protection as part of the real work, not as cleanup after the fact.
Step 3 – Remove Trim, Caulk, and Surface Details
Use a utility knife to score caulk where the soffit meets the ceiling, side walls, and cabinet tops. Make several light passes instead of forcing the blade through thick paint or old sealant. You may feel the knife drag through rubbery caulk, then break into a cleaner groove.
Remove crown molding, small trim strips, or decorative panels next. A pry bar works well, but keep the angle low and use gentle pressure. If you plan to reuse trim, label each piece as you remove it.
This step helps prevent torn drywall paper, cracked cabinet finishes, and rough ceiling damage when the main soffit material comes off.
Step 4 – Open a Small Inspection Area
Do not remove the whole soffit face right away. Cut a small inspection hole first, ideally on the underside or at one end where repairs will be easier. Use a drywall saw and shallow strokes so you do not hit anything hidden behind the surface.
Expect a gritty sound as the saw moves through drywall. Stop often and use a flashlight to look inside. You may see framing lumber, wall studs, insulation, old wiring, a vent duct, or empty space.
If the opening reveals wires, pipes, or ductwork, pause before going farther. You need to understand what each item does before you remove more material.
Step 5 – Decide Whether the Soffit Is Structural or Decorative
Most kitchen soffits are decorative covers built from light framing and drywall. Still, you should never assume. Look for signs that the soffit connects to major framing, supports ceiling changes, or hides beams. Heavy lumber, tight connections, and unusual framing patterns deserve extra caution.
A decorative soffit often has simple wood framing attached to wall studs and ceiling joists. It may only support drywall and trim. A structural element may carry weight or connect to important parts of the house.
If you cannot tell the difference, stop and call a contractor or structural professional. Removing the wrong framing can create ceiling cracks, sagging, or serious damage.
Step 6 – Handle Utilities Before Full Demolition
If you find electrical wiring, plumbing, or a vent duct, decide whether it can stay, move, or needs a licensed professional. Do not cut wires, loosen pipes, or tear out ductwork just to keep the project moving. Some items may be rerouted into the ceiling or wall, but that work must follow local code.
At this stage of how to remove soffit kitchen, patience saves money. A clean inspection lets you plan a safe path instead of creating an emergency repair.
If the soffit is empty or utilities have been properly handled, continue removing drywall in sections. Keep pieces small enough to control with one hand.
Step 7 – Remove Drywall and Framing Carefully
Once the soffit is safe to open, cut the drywall into manageable sections. Pull each piece away slowly and watch for screws, nails, and hidden seams. Drywall may snap with a dull crack and release a puff of white dust, so keep your mask on.
After the drywall is gone, expose the framing lumber. Use a drill to remove screws when possible. If nails hold the frame together, use a pry bar and work gently from the ends inward.

Avoid yanking framing away from the wall or ceiling. Slow pressure protects wall studs, ceiling drywall, cabinet boxes, and surrounding finishes.
Step 8 – Patch, Smooth, and Prepare the New Space
With the soffit removed, inspect the exposed ceiling and wall transitions. You may find gaps, torn drywall paper, uneven paint lines, or holes where framing was attached. Scrape loose material, vacuum dust, and check that the surface is dry and solid.
Apply drywall tape over seams and use patching compound to smooth the ceiling line and wall areas. Let each coat dry, then sand lightly. You may need more than one coat for a clean finish.
Once the surface is patched and primed, plan the next upgrade. The open space may be ready for taller upper cabinets, open shelving, new lighting, or a simple painted finish.
Common Mistakes When Removing a Kitchen Soffit
One common mistake is cutting into the soffit before checking for hidden utilities. Electrical wiring, plumbing, and vent duct runs often hide inside bulkheads. If you cut too deeply or start prying too soon, you can damage a wire, puncture a pipe, or crush a duct.
Another mistake is assuming every soffit is decorative. Many are simple covers, but some hide structural elements or complicated framing. If you see large lumber, unusual connections, or anything that looks load-bearing, stop and get expert help.
Beginners also forget to protect cabinets and counters. Drywall chunks, screws, nails, and trim pieces can scratch cabinet doors or chip countertops. Covering surfaces takes a few minutes and can prevent expensive damage.
A fourth mistake is removing too much drywall at once. Large pieces are awkward overhead and can fall suddenly. Smaller sections are safer, cleaner, and easier to carry.
Finally, many people underestimate finishing work. Removing the soffit is only half the project. Patching the ceiling, blending wall texture, priming, and painting often take more time than demolition.
Expert Tips
Use your stud finder before and after you open the soffit. The first scan helps you estimate framing locations, while the second confirms what you see inside. Mark wall studs, ceiling joists, and utility paths with painter’s tape so you do not lose track during demolition.
Keep your cuts shallow. A drywall saw can damage hidden wiring or ductwork if you push too hard. Short, careful strokes give you more control.
Work from one end to the other instead of tearing from the center. This keeps the frame stable while you remove it. Also, take photos at each stage. They help if you need advice, permits, utility rerouting, or a cabinet upgrade plan later.
Frequently Asked Questions
Can I Remove a Kitchen Soffit Myself?
Yes, many beginners can remove a kitchen soffit if it is decorative and does not contain utilities or structural framing. The key is to inspect first, cut a small opening, and move slowly. If you find electrical wiring, plumbing, ductwork, or heavy framing, stop and bring in the right professional before continuing.
How Do I Know If a Soffit Is Structural?
A structural soffit may contain beams, heavy framing, or connections that appear to support the ceiling or nearby walls. A decorative soffit usually has light framing covered with drywall. If you are unsure, do not guess. A contractor or structural professional can inspect it and tell you whether removal is safe.
What Might Be Hidden Inside a Kitchen Soffit?
A kitchen soffit may hide electrical wiring, plumbing lines, vent ductwork, framing lumber, insulation, or empty space. Soffits above ranges may contain exhaust ducting, while those near sinks may hide pipes. Older homes can have unexpected wiring paths, so always open a small inspection area before full demolition.
Will Removing a Soffit Damage My Cabinets?
It can damage cabinets if you pry carelessly or let debris fall onto finished surfaces. Protect cabinet faces, counters, and appliances before you start. Cut caulk lines around the soffit and work in small sections. If the soffit sits tight against upper cabinets, use gentle pressure and avoid forcing the drywall loose.
What Can I Do With the Space After Removal?
After removal, you can install taller upper cabinets, add open shelving, improve recessed lighting, or leave the wall open for a cleaner kitchen design. You will likely need to patch drywall, repair the ceiling line, prime, and paint first. A smooth finish makes the new space look intentional instead of unfinished.
Conclusion
Removing a kitchen soffit can make a room feel taller, brighter, and easier to update. The safest approach starts with inspection. Check for electrical wiring, plumbing, ductwork, and framing before you make large cuts. Then protect your cabinets and counters, remove trim, open a small test area, confirm what is inside, and take down drywall and framing in controlled sections.
Do not rush the finish work. Clean patching, drywall tape, sanding, priming, and painting help the ceiling and wall transitions look complete. Once the area is ready, you can plan open shelving, taller cabinets, improved lighting, or a full cabinet upgrade.
When you understand how to remove soffit kitchen, the project feels less mysterious and much more manageable. Work slowly, respect what may be hidden, and let each careful step guide the next one.

About
Nick Hall has spent the last seven years working at the intersection of kitchen design and home repair — first as a design assistant at a residential renovation studio, then as a freelance writer covering everything from cabinet layouts to leaky faucet fixes.
Her approach is simple: kitchens should look good and function well. That means she’s just as comfortable talking about color palettes and counter materials as she is walking readers through how to fix a wobbly cabinet hinge or troubleshoot a garbage disposal.
Nick has worked directly with homeowners on small-space kitchen makeovers, budget-conscious renovations, and the kind of everyday repairs that don’t need a contractor — just the right instructions. She writes from experience, not theory, and tests most of the fixes and tips she shares before publishing them.
When she’s not writing, Nick is usually hunting for mid-century kitchen finds at estate sales or helping friends plan their own renovations. She lives in Columbus, Ohio.