
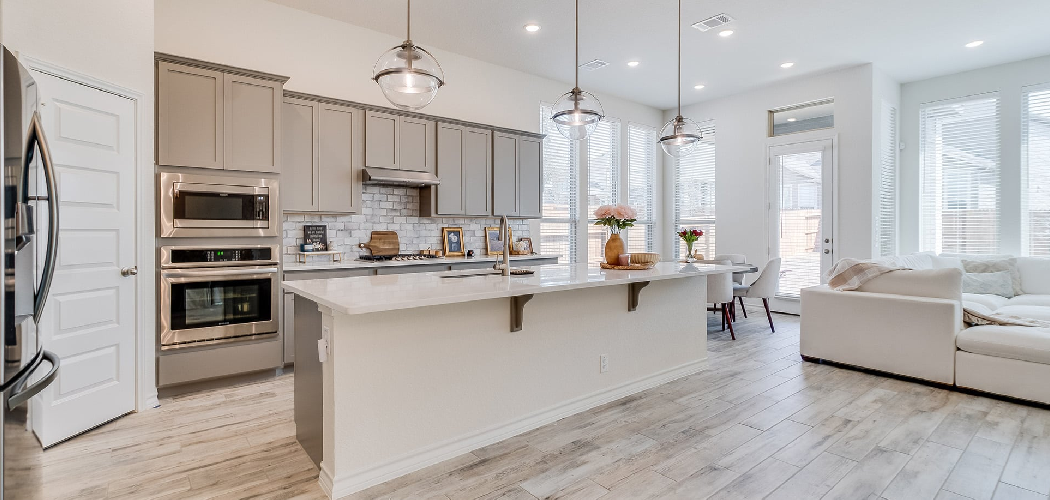

A polished kitchen does not always come from a full remodel or a luxury budget. In many cases, the most elegant spaces rely on smart styling, strong lighting, clean lines, and a few well-chosen finishes that make the room feel calm and complete. If you are just starting out, you do not need custom cabinets or designer appliances to create a more refined look. You need a clear plan, a good eye for detail, and the confidence to improve one layer at a time.
If you have been wondering how to make your kitchen look expensive, the good news is that small upgrades can create a big visual shift. This guide will show you how to build a high-end kitchen look with simple, beginner-friendly changes that work on a budget.
Why Learning High-End Design Matters
Learning the basics of high-end kitchen design helps you spend money with purpose instead of guessing your way through random upgrades. When you understand what makes a kitchen feel elevated, you can focus on the changes that matter most, such as lighting, hardware, color balance, and clutter control. That saves time, reduces waste, and helps you avoid buying items that do not work together.
This skill also matters if you live in a small home, an RV, a cabin, or another mobile or outdoor setting. In tight spaces, every surface shows. A few thoughtful details can make a compact kitchenette feel more custom, clean, and inviting. For beginners, this approach builds confidence fast. You learn that luxury is often less about price and more about proportion, finish, and visual order.
Tools and Materials
Before you start, gather a few basic items so the process feels simple and manageable.
- Microfiber cloths for cleaning and polishing surfaces
- Degreaser or gentle kitchen cleaner
- Paint supplies if you plan to refresh cabinets or walls
- Screwdriver for changing cabinet hardware
- Peel-and-stick backsplash tiles or backsplash paint
- New cabinet knobs or pulls
- Warm LED light bulbs
- Caulk for sealing visible gaps
- Contact paper or shelf liner for quick surface updates
- Storage trays, jars, or baskets for countertop organization
- A measuring tape for planning spacing and placement
- Optional: under-cabinet puck lights for an easy lighting upgrade
You do not need every item at once. Start with the basics, then add materials based on the upgrades you choose first.
Step-by-Step Guide on How to Make Your Kitchen Look Expensive
Step 1 – Clear visual clutter and clean every surface

The fastest way to create a more upscale kitchen is to remove anything that makes the room feel busy. Clear the counters first. Put away extra mugs, paper stacks, unmatched containers, and small appliances you do not use every day. Leave only a few useful pieces out, such as a coffee maker, a cutting board, or a bowl of fruit.
Then clean with care. Wipe cabinets, polish fixtures, scrub grout lines, and remove grease from backsplash areas. A kitchen that smells fresh and looks crisp already feels more expensive. Light reflects better on clean surfaces, and even older finishes look richer when they are free of dust, fingerprints, and sticky residue.
Step 2 – Choose a simple, polished color story
High-end kitchens rarely feel random. They usually follow a calm palette with two or three main tones repeated throughout the room. Think soft white, warm beige, charcoal, muted green, natural wood, brushed brass, or matte black. You do not need bold contrast everywhere. A steady mix of tones often feels more refined.
If you are learning how to make your kitchen look expensive, start by picking one dominant shade, one supporting tone, and one accent finish. This creates visual order and makes your kitchen feel intentional. Even if your cabinets, walls, and accessories are affordable, a consistent palette helps the room read as custom instead of pieced together.
Step 3 – Upgrade cabinet hardware for instant impact
Cabinet hardware works like jewelry in a kitchen. Old knobs, shiny mixed metals, or builder-grade pulls can make the whole room feel dated, even if the cabinets themselves are in good shape. Swapping hardware is one of the easiest beginner-friendly upgrades, and it often changes the mood of the room in less than an hour.
Choose hardware with a clean shape and a finish that suits your kitchen style. Brushed brass feels warm and classic. Matte black looks sharp and modern. Satin nickel is safe, timeless, and easy to pair with other finishes. Measure carefully before buying so new pieces fit existing holes. When hardware lines up neatly and feels sturdy in your hand, the kitchen starts to feel more tailored and much more expensive.
Step 4 – Improve lighting at every level
Lighting changes everything. A dim kitchen can look flat, cold, and tired, while layered lighting gives the room depth and warmth. Start with the bulbs you already have. Replace harsh cool lights with warm LED bulbs that flatter paint colors, wood tones, and countertops. The room should feel bright, but not glaring.
Next, think about adding a second layer of light. Under-cabinet lighting can make a basic kitchen feel finished because it highlights the backsplash and creates a soft glow across work surfaces. If you have a dining nook or island, a simple pendant with clean lines can bring in a designer touch. Good lighting makes metal finishes shine, counters look smoother, and the whole space feel more welcoming.
Step 5 – Refresh cabinets instead of replacing them
Cabinet replacement is expensive, but cabinet refreshes can look surprisingly high-end when done well. If your cabinets are solid but dated, paint may be the best value upgrade in the room. Soft white, warm greige, muted navy, and earthy green are popular because they feel current without being overly trendy. Smooth, even paint gives the impression of a much newer kitchen.

Take your time with prep. Clean away grease, sand lightly, and use the right primer so the finish lasts. If painting feels too big for now, even touching up chipped spots and adjusting crooked doors can improve the look. When cabinet fronts appear smooth, aligned, and freshly finished, the whole kitchen feels calmer, cleaner, and more intentional.
Step 6 – Add a backsplash or create one visually
A backsplash gives the eye a finished stopping point. Without it, the wall area between counters and cabinets can feel bare or unfinished. You do not need marble slab or handcrafted tile to get a luxe effect. Peel-and-stick options, painted stencil designs, or simple subway tile can create the same sense of polish when installed neatly.
This is another place where detail matters. Straight lines, even spacing, and clean edges make affordable materials look better. If you are exploring how to make your kitchen look expensive, focus less on using costly finishes and more on making the finish look crisp and deliberate. A clean backsplash catches light, frames the workspace, and helps the whole room feel complete.
Step 7 – Style countertops with restraint
Expensive-looking kitchens almost always show restraint. That does not mean the room feels empty. It means every visible item earns its place. Keep countertop styling simple and useful. A wooden cutting board leaned against the wall, a ceramic utensil holder, a bowl of lemons, or a glass jar of cooking tools can add warmth without creating clutter.
Think in small grouped moments instead of scattered objects. Two or three items together usually look better than seven unrelated pieces spread across the room. Try to mix texture as well. Wood, stone, glass, and ceramic create depth that makes a kitchen feel layered. When the counters breathe and the styling looks edited, the room starts to carry a quiet luxury that feels natural.
Step 8 – Use textiles and finishes to soften the space
A kitchen can feel expensive when hard surfaces are balanced with softness. This is where rugs, towels, window treatments, and seating details can help. Choose textiles that look simple and substantial. A washable runner with a muted pattern can add warmth to a galley kitchen. Crisp hand towels in neutral tones feel better than faded novelty prints.
Pay attention to finish quality, too. Matte and brushed surfaces often look more refined than anything too glossy or plastic-looking. If you have bar stools, check whether they wobble or look worn. If your curtains are limp or too short, replace them with something cleaner and better fitted. These soft layers change the feeling of the room and make it seem more thoughtfully designed.
Step 9 – Create better storage so the kitchen stays polished
A kitchen only looks expensive if it can stay tidy in real life. Good storage helps you maintain the look after the makeover is done. Inside cabinets and drawers, use trays, bins, and dividers so everyday items have a place. On open shelves, keep containers consistent in color or material so the space looks organized rather than crowded.
This matters even more in small homes, campers, and outdoor cooking setups where every inch counts. Visible chaos makes a space feel cheaper right away. Clear zones for spices, dishes, cleaning tools, and pantry staples make the kitchen easier to use and easier to keep attractive. The goal is not perfection. The goal is to make neatness feel easy enough that you can keep the room looking finished every day.
Common Mistakes
One common mistake is trying to copy luxury kitchens piece by piece without thinking about the whole room. A gold faucet, dark paint, and bold tile may each look great on their own, but together they can feel forced if the colors and finishes do not connect. A more expensive look comes from cohesion, not from piling on trends.
Another mistake is overdecorating countertops. Many beginners assume more styling means more personality, but too many objects make even a large kitchen feel cramped. A high-end room usually has breathing space. Leaving open areas on the counter helps every chosen item stand out more.
Poor lighting is another issue that drags down the entire kitchen. A beautiful paint color can look dull under cold bulbs, and a clean backsplash can disappear in shadow. Many people focus only on surfaces and ignore how the room is lit. That limits the effect of every other upgrade.
A fourth mistake is choosing low-cost materials that look obviously fake from a distance. Budget-friendly options can work well, but only when they are installed neatly and chosen with care. The finish should feel believable and suit the style of the room.
Finally, many beginners rush. Crooked hardware, messy caulk lines, and uneven paint instantly lower the result. Slow, careful work often looks more luxurious than expensive materials installed badly.
Expert Tips
If you want a kitchen to feel high-end, think in layers instead of single purchases. Start with cleanliness and color, then move to lighting, hardware, and styling. This order gives you the biggest visual improvement first and helps you see what the room still needs.
Try repeating one metal finish throughout the space for a more custom look. When cabinet pulls, faucet details, and lighting accents relate to each other, the room feels designed instead of assembled from separate shopping trips.
Pay close attention to scale. Oversized hardware on tiny cabinets or very small decor on a large counter can throw off the balance. In small kitchens especially, proportion matters. A few well-sized upgrades almost always look more expensive than many small, disconnected ones.
Frequently Asked Questions
Can I make my kitchen look expensive without renovating?
Yes. Many kitchens look more upscale through cosmetic changes alone. Deep cleaning, better lighting, updated hardware, and a tighter color palette can transform the space without changing the layout. Styling the counters with restraint also helps. Renovation is useful for major problems, but appearance often improves most through smart surface-level updates.
What cabinet color looks the most expensive?
There is no single best color, but soft white, warm greige, muted olive, and deep navy often look elevated when paired with the right finishes. The key is choosing a shade that suits your lighting and keeping the paint finish smooth. A well-prepped paint job in a calm, timeless tone usually looks better than a trendy color applied in a rush.
Is peel-and-stick backsplash a good idea?
It can be a very good idea if you choose a quality product and install it carefully. Straight lines, clean corners, and a believable finish make a big difference. It works especially well for renters, beginners, and anyone updating a small kitchen on a budget. The final look depends more on neat installation than on price alone.
How do I make a small kitchen feel more luxurious?
Focus on light, order, and consistency. Keep counters clear, use warm bulbs, and limit the room to a simple palette. Add one or two refined details, such as matching hardware or a narrow runner. In small kitchens, every choice is more visible, so fewer better-looking items usually create a stronger effect than many decorative extras.
What should I replace first on a tight budget?
Start with whatever looks most worn or outdated from across the room. For many kitchens, that means cabinet hardware, light bulbs, or cluttered countertops. If the cabinets are damaged, paint may give you the biggest return. If the room feels dark, improve lighting first. The best first step is usually the one that changes the whole mood fastest.
Conclusion
A beautiful kitchen does not depend on a luxury price tag. It depends on thoughtful choices, clean surfaces, balanced color, good lighting, and details that feel consistent from one end of the room to the other. When you focus on simple upgrades like hardware, cabinet refreshes, countertop styling, and smart storage, the space starts to feel more refined without becoming less practical.
The best part is that you do not need to do everything at once. Small changes can build on each other. As each layer improves, your kitchen begins to feel calmer, brighter, and more complete. That is what gives a room a high-end presence.
If you have been searching for how to make your kitchen look expensive, start with the basics and do them well. A clean, well-lit, thoughtfully styled kitchen can look far more elegant than a costly room filled with poor choices. With patience and a clear plan, you can create a space that feels elevated, welcoming, and truly your own.

About
Nick Hall has spent the last seven years working at the intersection of kitchen design and home repair — first as a design assistant at a residential renovation studio, then as a freelance writer covering everything from cabinet layouts to leaky faucet fixes.
Her approach is simple: kitchens should look good and function well. That means she’s just as comfortable talking about color palettes and counter materials as she is walking readers through how to fix a wobbly cabinet hinge or troubleshoot a garbage disposal.
Nick has worked directly with homeowners on small-space kitchen makeovers, budget-conscious renovations, and the kind of everyday repairs that don’t need a contractor — just the right instructions. She writes from experience, not theory, and tests most of the fixes and tips she shares before publishing them.
When she’s not writing, Nick is usually hunting for mid-century kitchen finds at estate sales or helping friends plan their own renovations. She lives in Columbus, Ohio.