
A double kitchen sink gives you room to wash on one side and rinse on the other, but all that convenience runs through a maze of pipes hiding under the cabinet. When those connections drip, clog, or come loose, it’s tempting to call a plumber and hand over a hefty bill. The truth is, this is a project you can absolutely handle yourself with a little patience and the right guidance.
Learning how to plumb double kitchen sink connections saves you money, builds real confidence, and means you’ll never panic over a slow drain again. The parts are simple, the tools are basic, and the logic clicks fast once you see it laid out. This guide walks you through the entire process, from shutting off the water to testing for leaks, so your finished setup drains smoothly and stays bone-dry.
Why Learning Double Kitchen Sink Plumbing Matters
This skill reaches way beyond your home kitchen. Once you understand how the pipes fit together, you can tackle plumbing almost anywhere water flows.
RV owners deal with double basins in tiny galley kitchens, and knowing how to swap a P-trap or tighten a slip-joint nut keeps a road trip from turning into a soggy mess. Trailer kitchens use the same compact layout, just on a smaller scale.
Campers and outdoor beginners building a wash station learn fast that drainage is everything. Cabin sinks tucked into rustic getaways often need fresh fittings after a long winter. And compact off-grid kitchens rely on clean, reliable drain alignment to make the most of limited space. Master the basics once, and you’ll fix sinks confidently in any setting, indoors or out, without ever waiting on a technician.
Tools and Materials You’ll Need
Gather everything before you crawl under the cabinet, so you’re not hunting for parts with a wrench in one hand. Most of these supplies are cheap and live at any hardware store.
- A double-bowl sink drain kit (tailpieces, continuous waste, and P-trap)
- Two basket strainers
- Plumber’s putty or silicone
- Slip-joint nuts and washers (usually included in the kit)
- Channel-lock pliers and an adjustable wrench
- A hacksaw or PVC cutter for trimming tubes
- A bucket and old towels to catch water
- A flashlight or headlamp for the dark cabinet
- A tape measure and a small level
One optional item worth grabbing is a basket strainer wrench. It locks onto the strainer from below so you can tighten everything without the basket spinning, which makes the whole job feel far less frustrating.
Step-by-Step Guide on How to Plumb Double Kitchen Sink
Step 1 – Shut Off Water and Clear the Cabinet
Before anything else, reach under the sink and turn the two supply valves clockwise until they stop. This shuts off both the hot and cold water lines feeding your faucet.
Open the faucet to release any pressure still trapped in the lines. You’ll hear a soft hiss, then a trickle, then nothing.
Now empty the cabinet completely. Pull out the cleaning sprays, the trash bag, the stack of forgotten sponges, and anything else crowding the space. Lay a towel and a bucket underneath the pipes, since lingering water always spills when you loosen the connections. A clear, dry workspace lets you move freely and see every fitting. Give yourself room to kneel and angle your flashlight without knocking things over.
Step 2 – Check Local Code and Drain Layout
Take a moment to study how everything currently connects before you touch a single nut. Snap a quick photo on your phone so you have a reference if the pieces blur together later.
Look at where the drain stub-out exits the wall and how high it sits. This height decides the slope of your trap arm, which matters more than beginners expect.
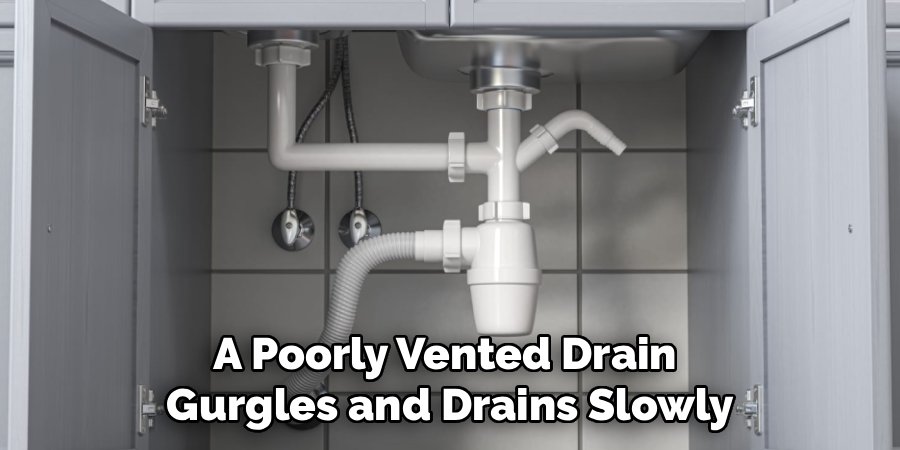
Glance at your local code too, since some areas require specific venting or restrict certain fittings. A poorly vented drain gurgles and drains slowly, no matter how tight your joints are. Note whether your pipes are PVC or ABS, since you’ll want matching parts. Understanding the existing layout now saves you from buying the wrong kit and redoing the work twice.
Step 3 – Dry-Fit the Tailpieces and Basket Strainers
Start assembling without any sealant first, just to see how the pieces line up. This dry run reveals problems while they’re still easy to fix.
Set a basket strainer into each drain opening and check that they sit flush. Then thread a tailpiece onto the bottom of each strainer, hand-tight for now. The tailpieces are the vertical tubes dropping straight down from each bowl.
Hold the continuous waste piece up against them to picture how the two drains will join. Knowing how to plumb double kitchen sink connections starts with this patient dry-fit, where you confirm every part reaches its neighbor without strain. If a tube sits too long, mark it for trimming. Loose, comfortable alignment now prevents cracked fittings and leaks later.
Step 4 – Install the Continuous Waste Arm and Slip-Joint Connections
Now seal the basket strainers for real. Roll a rope of plumber’s putty between your palms, press it under each strainer lip, and tighten the strainer from below until putty squeezes out.
Wipe away that excess ring of putty with your finger. It feels soft and slightly oily, almost like clay.
Next, connect the continuous waste arm, the horizontal pipe that ties both tailpieces into one drain. Slide a slip-joint nut and washer onto each connection, making sure the beveled side of the washer faces the joint. Thread the nuts on by hand first to avoid cross-threading. The continuous waste keeps both bowls draining into a single P-trap, which keeps your setup compact. Snug everything gently, leaving room for small adjustments before the final tightening.
Step 5 – Set the P-Trap and Trap Arm With Proper Slope
The P-trap is that U-shaped bend that holds a little water to block sewer gas from creeping up into your kitchen. Connect it to the bottom of the continuous waste outlet using another slip-joint nut and washer.
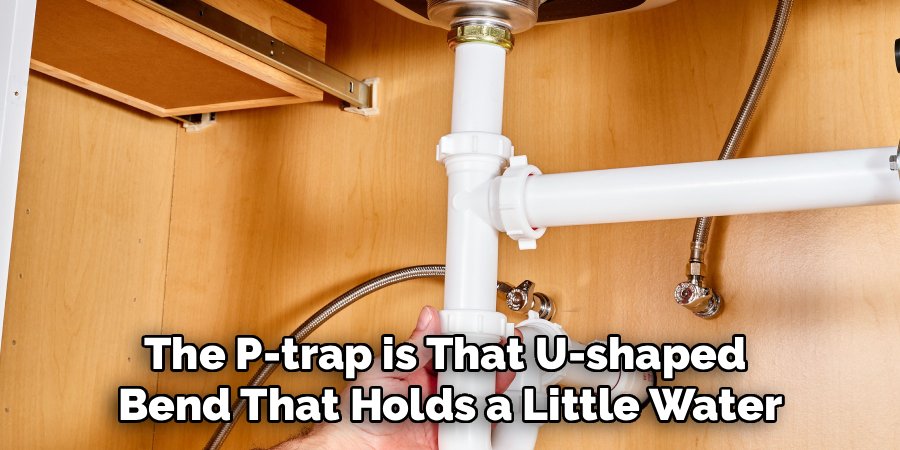
The trap arm runs horizontally from the trap to the drain stub-out in the wall. This is where slope matters most.
Aim for a gentle downward tilt of about a quarter inch per foot toward the wall. Too flat, and water pools and stinks. Too steep, and water races ahead, leaving solids behind to clog. Rest your small level along the trap arm to check the angle. Trim the wall tube with your PVC cutter if it runs too long, then slide it into the stub-out.
Step 6 – Connect the Dishwasher Branch or Disposal
If you have a garbage disposal, mount it under one bowl in place of that side’s tailpiece. The disposal carries its own weight, so support it while you twist the mounting ring until it locks with a firm click.
For a dishwasher, find the small dishwasher branch tailpiece with its angled inlet. Slide the dishwasher’s drain hose onto that barbed fitting and lock it down with a hose clamp.
Tighten the clamp with a screwdriver until the hose grips snugly. A loose clamp here leaks dirty water across your cabinet floor mid-cycle. If you have neither appliance, simply use a standard tailpiece on both sides. Double-check that the disposal outlet feeds correctly into the continuous waste so both bowls still drain as one.
Step 7 – Tighten and Align All Fittings
With everything dry-fitted and positioned, go back and tighten each connection in order. The rule to remember is hand-tight plus a quarter turn with your channel-lock pliers.
Resist the urge to crank these fittings hard. Slip-joint nuts are plastic, and overtightening cracks them or crushes the washer, which actually causes leaks instead of stopping them.
Work your way from the strainers down to the P-trap, checking drain alignment as you go. Every pipe should meet its neighbor straight on, with no sideways tension pulling at a joint. A misaligned fitting looks fine but drips quietly for weeks. Wiggle each section gently to confirm it feels solid, not strained. Snug, square, and stress-free is exactly what you’re after here.
Step 8 – Test for Leaks and Drainage
Now for the moment of truth. Turn the supply valves back on, then plug one bowl and fill it with water.
Pull the stopper and watch the water rush down while you shine your flashlight on every joint below. Run your fingertips along each slip-joint nut, feeling for the slightest dampness.
A pinhole leak shows up as a slow bead of water forming on the bottom of a fitting. If you spot one, snug that nut another small turn or recheck the washer seat. Repeat the test on the second bowl, then fill both and drain them together to stress the continuous waste. Listen for smooth draining without gurgling, which signals proper venting. When everything stays dry and drains fast, you’re done.
Critical Mistakes When Plumbing a Double Kitchen Sink
The most common mistake by far is overtightening the slip-joint nuts. Beginners assume tighter means leak-proof, but these plastic fittings crack under too much force or crush the washer out of shape. Hand-tight plus a quarter turn is genuinely all you need, and forcing more invites the very leaks you’re trying to prevent.
Another frequent error is getting the trap arm slope wrong. A pipe that runs dead flat lets water and debris sit and stagnate, while one tilted too steeply drains so fast it leaves gunk behind. Both lead to clogs and smells. Aim for that gentle quarter-inch-per-foot drop and check it with a level.
Forgetting the washers, or installing them backward, trips up plenty of folks too. The beveled side faces into the joint, and skipping a washer guarantees a steady drip no matter how hard you tighten.
Finally, ignoring venting causes slow, gurgling drains that no amount of tightening will fix. If your sink glugs and empties sluggishly, the problem lives in the vent, not the fittings. Plan your layout with proper airflow in mind, and your drains will run quiet and quick.
Expert Tips
Keep a small dish nearby to hold the slip-joint nuts and washers as you work. These tiny parts roll into corners and vanish the moment you set them down, and a dedicated spot saves a frustrating search.
Smear a thin coat of dish soap on the threads and washers before assembly. The fittings slide together smoother and seat more evenly, which helps you avoid cross-threading.
Always dry-fit the entire setup before sealing anything. Seeing the full puzzle come together first reveals length problems and alignment issues while they’re still painless to fix.
Finally, run a paper towel along each joint after testing rather than just looking. Paper catches the faintest moisture your eyes might miss, so you’ll spot a slow leak before it ever stains your cabinet floor.
Frequently Asked Questions
Do Both Sink Bowls Share One P-Trap?
Yes, in most standard double-sink setups, both bowls drain into a single P-trap through a continuous waste pipe. This keeps the layout compact and saves space under your cabinet. The continuous waste arm ties the two tailpieces together before they reach the trap. Some older or oversized installations use two separate traps, but the single shared trap is the simpler, more common, and code-friendly choice for most kitchens.
What Slope Should the Trap Arm Have?
Aim for a gentle downward slope of about a quarter inch per foot toward the drain stub-out. This angle lets water and waste flow steadily without pooling or racing too fast. Getting it right matters:
- Too flat causes standing water, odors, and clogs
- Too steep lets water outrun solids, leaving buildup behind
Rest a small level along the trap arm to confirm the tilt before you tighten everything down.
Should I Use Plumber’s Putty or Silicone on the Strainers?
Either works well for sealing basket strainers, though many people prefer plumber’s putty for its easy cleanup and reliable seal. Roll it into a rope, press it under the strainer lip, and tighten until the excess squeezes out. Silicone holds tighter and lasts longer but takes time to cure and resists removal later. For a beginner who might adjust things, putty is the friendlier, more forgiving choice.
How Tight Should the Slip-Joint Nuts Be?
The golden rule is hand-tight plus a quarter turn with pliers. Slip-joint nuts are plastic, so they don’t need much force to seal properly against the washer. Cranking them hard cracks the nut or deforms the washer, which actually creates leaks instead of stopping them. If a joint drips, recheck the washer position first before adding another small turn. Gentle and snug beats brute force every time.
Why Does My Double Sink Drain Slowly or Gurgle?
Slow draining and gurgling almost always point to a venting problem rather than a clog or loose fitting. Without proper airflow, water struggles to pull through and creates that glugging sound. Check that your drain connects to an adequate vent. A partial clog in the trap or continuous waste can cause it too, so clear those first, then look at venting if the noise continues.
Conclusion
Plumbing a double kitchen sink looks like a tangle of mystery pipes at first, but it breaks down into simple, logical steps once you get under there and start connecting parts. Shut off the water, study your layout, and dry-fit everything before you seal a single joint. Set your basket strainers with putty, join the bowls with the continuous waste, hang the P-trap with proper slope, and tighten each fitting just hand-tight plus a quarter turn. Then test thoroughly until every joint stays dry and the water drains fast and quiet.
Take it one connection at a time, and you’ll be surprised how naturally it all comes together. The money you save and the confidence you gain are worth every minute under that cabinet.
So grab your wrench, line up your parts, and get to work. Now that you understand how to plumb double kitchen sink connections from start to finish, you can tackle this repair yourself, skip the costly service call, and enjoy a kitchen that drains perfectly every single day. You’ve got this.

About
Nick Hall has spent the last seven years working at the intersection of kitchen design and home repair — first as a design assistant at a residential renovation studio, then as a freelance writer covering everything from cabinet layouts to leaky faucet fixes.
Her approach is simple: kitchens should look good and function well. That means she’s just as comfortable talking about color palettes and counter materials as she is walking readers through how to fix a wobbly cabinet hinge or troubleshoot a garbage disposal.
Nick has worked directly with homeowners on small-space kitchen makeovers, budget-conscious renovations, and the kind of everyday repairs that don’t need a contractor — just the right instructions. She writes from experience, not theory, and tests most of the fixes and tips she shares before publishing them.
When she’s not writing, Nick is usually hunting for mid-century kitchen finds at estate sales or helping friends plan their own renovations. She lives in Columbus, Ohio.